目录
一、开发环境配置
二、内存管理与优化
三、模板元编程
四、并发与并行编程
五、实践练习
一、开发环境配置
CMake
g++14
支持C++23需要g++14版本,可以安装
1 sudo apt install gcc-14 g++-14
Cmake
新建 CMakeLists.txt 里面写
1
2
3
4
5
6
7
8
cmake_minimum_required (VERSION 3.28 )set (CMAKE_CXX_COMPILER g++-14 )set (CMAKE_CXX_STANDARD 23 )project (exampleproject LANGUAGES CXX)add_executable (exampleproject main.cpp)
构建
优点: - 明确指定源代码和构建目录 - 避免在源代码目录中生成构建文件 -
支持out-of-source构建(推荐做法)
1 cmake -S /mnt/d/Fyind/Master_Semester7/cpp -B /mnt/d/Fyind/Master_Semester7/cpp/build
C++23
print
1 2 3 4 5 6 7 8 #include <print> int main () std::println ("Hello world" ); std::string name = "Fyind" ; int age = 25 ; std::println ("Name: {}, Age: {}" , name, age); }
noexcept
noexcept 是 C++11
引入的异常规范关键字,用于声明函数不会抛出异常。
作用: 1. 编译器优化 - 编译器可以进行更激进的优化 2. 移动语义 -
标准库容器会优先使用noexcept的移动构造函数 3. 文档化 -
明确告知调用者函数不会抛异常
1 2 3 4 5 6 void func () noexcept void func () noexcept (condition)
C++23 线程池详解
为什么需要线程池?
传统多线程的问题
现实比喻 :传统方式就像每次需要司机时都去招聘新人
招聘费时费力(创建线程开销大)
培训新人耗费资源(线程初始化)
任务完成后解雇(销毁线程)
下次又要重新招聘(重复创建销毁)
1 2 3 4 5 6 7 8 9 10 11 12 13 14 15 16 17 18 19 20 21 22 23 24 void demonstrate_traditional_problems () auto start = std::chrono::high_resolution_clock::now (); std::vector<std::thread> threads; for (int i = 0 ; i < 1000 ; ++i) { threads.emplace_back ([i]() { int result = i * i; std::this_thread::sleep_for (std::chrono::milliseconds (1 )); }); } for (auto & t : threads) { t.join (); } auto end = std::chrono::high_resolution_clock::now (); std::cout << "传统方式耗时: " << std::chrono::duration_cast <std::chrono::milliseconds>(end - start).count () << "ms" << std::endl; }
线程池的优势
现实比喻 :线程池就像一个专业的出租车公司
公司养着固定数量的司机(工作线程)
客户叫车时分配空闲司机(任务分配)
任务完成后司机回到公司待命(线程复用)
避免频繁招聘解雇的开销
技术优势 :
性能提升 :避免线程创建/销毁开销资源控制 :限制并发线程数量任务管理 :统一的任务队列和调度系统稳定 :防止线程过多导致系统崩溃
基础线程池实现
1 2 3 4 5 6 7 8 9 10 11 12 13 14 15 16 17 18 19 20 21 22 23 24 25 26 27 28 29 30 31 32 33 34 35 36 37 38 39 40 41 42 43 44 45 46 47 48 49 50 51 52 53 54 55 56 57 58 59 60 61 62 63 64 65 66 67 68 69 70 71 72 73 74 75 76 77 78 79 80 81 82 83 84 85 86 87 88 89 90 91 92 93 94 95 96 97 98 99 100 101 102 103 104 105 106 107 108 #include <vector> #include <queue> #include <thread> #include <mutex> #include <condition_variable> #include <future> #include <functional> #include <memory> class SimpleThreadPool {public : explicit SimpleThreadPool (size_t num_threads) : stop_flag(false) { for (size_t i = 0 ; i < num_threads; ++i) { workers.emplace_back ([this , i] { std::cout << "工作线程 " << i << " 启动\n" ; while (true ) { std::function<void ()> task; { std::unique_lock<std::mutex> lock (queue_mutex); condition.wait (lock, [this ] { return stop_flag || !task_queue.empty (); }); if (stop_flag && task_queue.empty ()) { std::cout << "工作线程 " << i << " 退出\n" ; return ; } task = std::move (task_queue.front ()); task_queue.pop (); } std::cout << "线程 " << i << " 执行任务\n" ; task (); } }); } } template <typename F, typename ... Args> auto submit (F&& f, Args&&... args) -> std::future<typename std::invoke_result_t <F, Args...>> { using return_type = typename std::invoke_result_t <F, Args...>; auto task = std::make_shared<std::packaged_task<return_type ()>>( std::bind (std::forward<F>(f), std::forward<Args>(args)...) ); std::future<return_type> result = task->get_future (); { std::unique_lock<std::mutex> lock (queue_mutex) ; if (stop_flag) { throw std::runtime_error ("线程池已停止,无法提交新任务" ); } task_queue.emplace ([task]() { (*task)(); }); } condition.notify_one (); return result; } ~SimpleThreadPool () { std::cout << "开始关闭线程池...\n" ; { std::unique_lock<std::mutex> lock (queue_mutex) ; stop_flag = true ; } condition.notify_all (); for (auto & worker : workers) { worker.join (); } std::cout << "线程池已关闭\n" ; } private : std::vector<std::thread> workers; std::queue<std::function<void ()>> task_queue; std::mutex queue_mutex; std::condition_variable condition; bool stop_flag; };
基础使用示例
1
2
3
4
5
6
7
8
9
10
11
12
13
14
15
16
17
18
19
20
21
22
23
24
25
26
27
28
29
30
31
void basic_threadpool_demo () std::cout << "\n=== 基础线程池演示 ===\n" ; SimpleThreadPool pool (4 ) ; std::vector<std::future<int >> futures; for (int i = 0 ; i < 8 ; ++i) { futures.push_back (pool.submit ([i]() -> int { std::this_thread::sleep_for (std::chrono::milliseconds (500 )); std::cout << "任务 " << i << " 完成,结果: " << i * i << std::endl; return i * i; })); } auto string_future = pool.submit ([]() -> std::string { std::this_thread::sleep_for (std::chrono::milliseconds (300 )); return "Hello ThreadPool!" ; }); std::cout << "\n收集结果:\n" ; for (auto & future : futures) { std::cout << "计算结果: " << future.get () << std::endl; } std::cout << "字符串结果: " << string_future.get () << std::endl; }
高级线程池特性
1. 优先级任务队列
1
2
3
4
5
6
7
8
9
10
11
12
13
14
15
16
17
18
19
20
21
22
23
24
25
26
27
28
29
30
31
32
33
34
35
36
37
38
39
40
41
42
43
44
45
46
47
48
49
50
51
52
53
54
55
56
57
58
59
60
61
62
63
64
65
66
67
68
69
70
71
72
73
74
75
76
77
78
79
80
81
class PriorityThreadPool {public : enum class Priority : int { LOW = 0 , NORMAL = 1 , HIGH = 2 , URGENT = 3 }; private : struct PriorityTask { std::function<void ()> task; Priority priority; std::chrono::steady_clock::time_point submit_time; bool operator <(const PriorityTask& other) const { if (priority != other.priority) { return priority < other.priority; } return submit_time > other.submit_time; } }; std::priority_queue<PriorityTask> priority_queue; public : template <typename F, typename ... Args> auto submit_with_priority (Priority priority, F&& f, Args&&... args) -> std::future<typename std::invoke_result_t <F, Args...>> { using return_type = typename std::invoke_result_t <F, Args...>; auto task = std::make_shared<std::packaged_task<return_type ()>>( std::bind (std::forward<F>(f), std::forward<Args>(args)...) ); std::future<return_type> result = task->get_future (); { std::unique_lock<std::mutex> lock (queue_mutex) ; priority_queue.push ({ [task]() { (*task)(); }, priority, std::chrono::steady_clock::now () }); } condition.notify_one (); return result; } }; void priority_demo () PriorityThreadPool pool (2 ) ; auto low = pool.submit_with_priority (PriorityThreadPool::Priority::LOW, []() { std::this_thread::sleep_for (std::chrono::milliseconds (100 )); std::cout << "低优先级任务完成\n" ; return 1 ; }); auto high = pool.submit_with_priority (PriorityThreadPool::Priority::HIGH, []() { std::this_thread::sleep_for (std::chrono::milliseconds (100 )); std::cout << "高优先级任务完成\n" ; return 2 ; }); auto urgent = pool.submit_with_priority (PriorityThreadPool::Priority::URGENT, []() { std::this_thread::sleep_for (std::chrono::milliseconds (100 )); std::cout << "紧急任务完成\n" ; return 3 ; }); std::cout << "紧急任务结果: " << urgent.get () << std::endl; std::cout << "高优先级结果: " << high.get () << std::endl; std::cout << "低优先级结果: " << low.get () << std::endl; }
2. 动态调整线程数量
1
2
3
4
5
6
7
8
9
10
11
12
13
14
15
16
17
18
19
20
21
22
23
24
25
26
27
28
29
30
31
32
33
34
35
36
37
38
39
40
41
42
43
44
45
46
47
48
49
50
51
52
53
54
55
56
57
58
59
60
61
62
63
64
65
66
67
68
69
70
71
72
73
74
75
76
77
78
79
80
81
82
83
84
85
86
87
88
89
90
91
92
93
94
95
96
97
98
99
100
101
102
103
class DynamicThreadPool {private : std::atomic<size_t > active_threads{0 }; std::atomic<size_t > idle_threads{0 }; const size_t min_threads; const size_t max_threads; std::thread monitor_thread; std::atomic<bool > monitor_stop{false }; public : DynamicThreadPool (size_t min_t , size_t max_t ) : min_threads (min_t ), max_threads (max_t ) { for (size_t i = 0 ; i < min_threads; ++i) { add_worker (); } monitor_thread = std::thread (&DynamicThreadPool::monitor_load, this ); } private : void monitor_load () while (!monitor_stop) { std::this_thread::sleep_for (std::chrono::milliseconds (500 )); size_t queue_size; { std::lock_guard<std::mutex> lock (queue_mutex) ; queue_size = task_queue.size (); } size_t current_active = active_threads.load (); size_t current_idle = idle_threads.load (); if (queue_size > current_active * 2 && current_active < max_threads) { add_worker (); std::cout << "增加工作线程,当前活跃线程: " << active_threads.load () << std::endl; } else if (queue_size == 0 && current_idle > 1 && current_active > min_threads) { signal_worker_exit (); std::cout << "减少工作线程,当前活跃线程: " << active_threads.load () << std::endl; } } } void add_worker () active_threads++; std::thread ([this ]() { while (true ) { std::function<void ()> task; bool should_exit = false ; { std::unique_lock<std::mutex> lock (queue_mutex); idle_threads++; condition.wait (lock, [this ] { return stop_flag || !task_queue.empty () || worker_exit_count > 0 ; }); idle_threads--; if (stop_flag) break ; if (worker_exit_count > 0 && task_queue.empty ()) { worker_exit_count--; should_exit = true ; } else if (!task_queue.empty ()) { task = std::move (task_queue.front ()); task_queue.pop (); } } if (should_exit) { active_threads--; return ; } if (task) { task (); } } active_threads--; }).detach (); } std::atomic<int > worker_exit_count{0 }; void signal_worker_exit () worker_exit_count++; condition.notify_one (); } };
实际应用场景
1. Web服务器
1
2
3
4
5
6
7
8
9
10
11
12
13
14
15
16
17
18
19
20
21
22
23
24
25
26
27
28
29
30
31
32
33
34
35
36
37
38
39
40
41
42
43
44
45
46
47
48
class WebServer { SimpleThreadPool request_pool; SimpleThreadPool io_pool; public : WebServer () : request_pool (8 ), io_pool (4 ) {} void handle_request (const std::string& request_data) request_pool.submit ([this , request_data]() { try { auto response = process_request (request_data); io_pool.submit ([response]() { send_response (response); }); } catch (const std::exception& e) { std::cerr << "请求处理错误: " << e.what () << std::endl; } }); } private : std::string process_request (const std::string& request) { std::this_thread::sleep_for (std::chrono::milliseconds (200 )); return "HTTP/1.1 200 OK\r\n\r\n{\"status\":\"success\"}" ; } void send_response (const std::string& response) std::this_thread::sleep_for (std::chrono::milliseconds (50 )); std::cout << "响应已发送: " << response.size () << " bytes\n" ; } }; void web_server_demo () WebServer server; for (int i = 0 ; i < 20 ; ++i) { server.handle_request ("GET /api/user/" + std::to_string (i)); } std::this_thread::sleep_for (std::chrono::seconds (3 )); }
2. 图像批处理
1
2
3
4
5
6
7
8
9
10
11
12
13
14
15
16
17
18
19
20
21
22
23
24
25
26
27
28
29
30
31
32
33
34
35
36
37
38
39
40
41
42
43
44
45
46
47
48
49
50
51
52
53
54
55
56
57
58
59
60
61
62
63
64
65
66
67
68
69
70
71
72
73
74
struct Image { int width, height; std::vector<uint8_t > data; std::string filename; }; class ImageProcessor { SimpleThreadPool processing_pool; public : ImageProcessor () : processing_pool (std::thread::hardware_concurrency ()) {} std::future<Image> process_image_async (const Image& input, const std::string& filter_type) return processing_pool.submit ([input, filter_type]() -> Image { Image result = input; if (filter_type == "blur" ) { apply_blur_filter (result); } else if (filter_type == "sharpen" ) { apply_sharpen_filter (result); } else if (filter_type == "grayscale" ) { convert_to_grayscale (result); } std::cout << "处理完成: " << result.filename << " (" << filter_type << ")\n" ; return result; }); } void batch_process (const std::vector<Image>& images, const std::string& output_dir) std::vector<std::future<Image>> futures; for (const auto & img : images) { futures.push_back (process_image_async (img, "blur" )); futures.push_back (process_image_async (img, "grayscale" )); } for (auto & future : futures) { try { auto processed_img = future.get (); save_image (processed_img, output_dir); } catch (const std::exception& e) { std::cerr << "图像处理失败: " << e.what () << std::endl; } } } private : void apply_blur_filter (Image& img) std::this_thread::sleep_for (std::chrono::milliseconds (100 )); } void apply_sharpen_filter (Image& img) std::this_thread::sleep_for (std::chrono::milliseconds (120 )); } void convert_to_grayscale (Image& img) std::this_thread::sleep_for (std::chrono::milliseconds (80 )); } void save_image (const Image& img, const std::string& output_dir) std::this_thread::sleep_for (std::chrono::milliseconds (50 )); std::cout << "保存图像: " << output_dir << "/" << img.filename << std::endl; } };
性能对比与最佳实践
性能测试
1
2
3
4
5
6
7
8
9
10
11
12
13
14
15
16
17
18
19
20
21
22
23
24
25
26
27
28
29
30
31
32
33
34
35
36
37
38
39
40
41
42
43
44
45
46
47
48
49
50
51
52
53
54
55
56
57
58
59
60
61
62
63
64
65
66
67
68
69
70
71
void comprehensive_performance_test () const int num_tasks = 1000 ; const int task_work_ms = 5 ; std::cout << "\n=== 性能对比测试 ===\n" ; auto start = std::chrono::high_resolution_clock::now (); { std::vector<std::thread> threads; threads.reserve (num_tasks); for (int i = 0 ; i < num_tasks; ++i) { threads.emplace_back ([task_work_ms]() { std::this_thread::sleep_for (std::chrono::milliseconds (task_work_ms)); }); } for (auto & t : threads) { t.join (); } } auto traditional_time = std::chrono::high_resolution_clock::now () - start; start = std::chrono::high_resolution_clock::now (); { SimpleThreadPool pool (std::thread::hardware_concurrency()) ; std::vector<std::future<void >> futures; futures.reserve (num_tasks); for (int i = 0 ; i < num_tasks; ++i) { futures.push_back (pool.submit ([task_work_ms]() { std::this_thread::sleep_for (std::chrono::milliseconds (task_work_ms)); })); } for (auto & future : futures) { future.get (); } } auto threadpool_time = std::chrono::high_resolution_clock::now () - start; start = std::chrono::high_resolution_clock::now (); { std::vector<std::future<void >> futures; futures.reserve (num_tasks); for (int i = 0 ; i < num_tasks; ++i) { futures.push_back (std::async (std::launch::async, [task_work_ms]() { std::this_thread::sleep_for (std::chrono::milliseconds (task_work_ms)); })); } for (auto & future : futures) { future.get (); } } auto async_time = std::chrono::high_resolution_clock::now () - start; std::cout << "传统多线程: " << std::chrono::duration_cast <std::chrono::milliseconds>(traditional_time).count () << "ms" << std::endl; std::cout << "线程池: " << std::chrono::duration_cast <std::chrono::milliseconds>(threadpool_time).count () << "ms" << std::endl; std::cout << "std::async: " << std::chrono::duration_cast <std::chrono::milliseconds>(async_time).count () << "ms" << std::endl; }
最佳实践总结
1
2
3
4
5
6
7
8
9
10
11
12
13
14
15
16
17
18
19
20
21
22
23
24
25
26
27
28
29
30
31
32
33
34
35
36
37
38
39
40
41
42
43
44
45
46
47
48
49
50
51
52
53
54
55
56
57
58
59
60
61
62
63
64
65
66
67
68
69
70
71
72
73
74
75
76
namespace ThreadPoolBestPractices { size_t optimal_thread_count_for_task_type (const std::string& task_type) size_t hw_threads = std::thread::hardware_concurrency (); if (task_type == "cpu_intensive" ) { return hw_threads; } else if (task_type == "io_intensive" ) { return hw_threads * 2 ; } else if (task_type == "mixed" ) { return hw_threads + hw_threads / 2 ; } return hw_threads; } void demonstrate_task_granularity () SimpleThreadPool pool (4 ) ; const size_t total_work = 1000000 ; const size_t chunk_size = total_work / (pool.size () * 4 ); std::vector<std::future<long long >> futures; for (size_t start = 0 ; start < total_work; start += chunk_size) { size_t end = std::min (start + chunk_size, total_work); futures.push_back (pool.submit ([start, end]() -> long long { long long sum = 0 ; for (size_t i = start; i < end; ++i) { sum += i; } return sum; })); } long long total_sum = 0 ; for (auto & future : futures) { total_sum += future.get (); } std::cout << "总和: " << total_sum << std::endl; } void demonstrate_exception_handling () SimpleThreadPool pool (2 ) ; auto future1 = pool.submit ([]() -> int { std::this_thread::sleep_for (std::chrono::milliseconds (100 )); throw std::runtime_error ("任务执行失败" ); return 42 ; }); auto future2 = pool.submit ([]() -> int { std::this_thread::sleep_for (std::chrono::milliseconds (200 )); return 24 ; }); try { auto result1 = future1. get (); std::cout << "结果1: " << result1 << std::endl; } catch (const std::exception& e) { std::cout << "捕获异常: " << e.what () << std::endl; } try { auto result2 = future2. get (); std::cout << "结果2: " << result2 << std::endl; } catch (const std::exception& e) { std::cout << "意外异常: " << e.what () << std::endl; } } }
线程池选择指南
1
2
3
4
5
6
7
8
9
10
11
12
13
14
15
void threadpool_selection_guide () std::cout << "\n=== 线程池选择指南 ===\n" ; std::cout << "1. 简单任务,偶尔使用:使用 std::async\n" ; std::cout << "2. 大量短任务:使用基础线程池\n" ; std::cout << "3. 任务有优先级:使用优先级线程池\n" ; std::cout << "4. 负载变化大:使用动态线程池\n" ; std::cout << "5. 不同类型任务:使用多个专用线程池\n" ; auto task_type = "cpu_intensive" ; auto thread_count = ThreadPoolBestPractices::optimal_thread_count_for_task_type (task_type); std::cout << "推荐线程数 (" << task_type << "): " << thread_count << std::endl; }
C++23
标准线程池:std::execution
C++23 执行器框架简介
C++23引入了革命性的执行器框架(Execution
Framework) ,这是对异步和并行编程的重大改进。虽然标准库不直接提供std::thread_pool类,但提供了更强大的std::execution执行器框架。
执行器模型 vs 传统线程池
传统线程池模型 : 1 2 3 4 ThreadPool pool (4 ) ;auto future = pool.submit ([]() { return compute (); });auto result = future.get ();
C++23执行器模型 : 1 2 3 4 5 6 auto scheduler = std::execution::thread_pool (4 ).get_scheduler ();auto result = std::execution::sync_wait ( std::execution::schedule (scheduler) | std::execution::then ([]() { return compute (); }) );
核心概念解释
1. 调度器 (Scheduler)
比喻 :调度器就像机场的调度塔 -
决定任务在何时何地执行 - 管理执行资源(线程、队列等) -
提供执行环境的抽象
1 2 3 4 5 6 #include <execution> auto thread_scheduler = std::execution::thread_pool (8 ).get_scheduler (); auto inline_scheduler = std::execution::inline_scheduler{}; auto timer_scheduler = std::execution::timed_scheduler{};
2. 发送器 (Sender)
比喻 :发送器就像快递包裹 - 封装了一个异步操作 -
描述要做什么,但还没开始执行 - 可以组合、变换、传递
1 2 3 4 5 6 7 8 9 auto sender = std::execution::schedule (scheduler) | std::execution::then ([]() { std::cout << "Hello from thread pool!\n" ; return 42 ; }); auto result = std::execution::sync_wait (sender);
3. 接收器 (Receiver)
比喻 :接收器就像快递收件人 - 处理异步操作的结果 -
定义成功、错误、取消的处理逻辑
标准线程池的实际使用
基础用法
1 2 3 4 5 6 7 8 9 10 11 12 13 14 15 16 17 18 19 20 21 22 23 24 25 26 27 28 29 30 31 32 33 34 35 #include <execution> #include <iostream> #include <vector> #include <algorithm> void basic_execution_example () std::execution::thread_pool pool (std::thread::hardware_concurrency()) ; auto scheduler = pool.get_scheduler (); std::cout << "=== C++23 执行器基础示例 ===\n" ; auto simple_task = std::execution::schedule (scheduler) | std::execution::then ([]() { std::this_thread::sleep_for (std::chrono::milliseconds (100 )); return "任务完成!" ; }); auto result = std::execution::sync_wait (simple_task); if (result) { std::cout << "结果: " << result.value () << std::endl; } auto chained_task = std::execution::schedule (scheduler) | std::execution::then ([]() { return 10 ; }) | std::execution::then ([](int x) { return x * 2 ; }) | std::execution::then ([](int x) { return x + 5 ; }); auto chain_result = std::execution::sync_wait (chained_task); if (chain_result) { std::cout << "链式计算结果: " << chain_result.value () << std::endl; } }
错误处理
1 2 3 4 5 6 7 8 9 10 11 12 13 14 15 16 17 18 19 20 21 22 23 24 25 26 void error_handling_example () std::execution::thread_pool pool (2 ) ; auto scheduler = pool.get_scheduler (); auto risky_task = std::execution::schedule (scheduler) | std::execution::then ([]() -> int { if (std::rand () % 2 ) { throw std::runtime_error ("随机错误" ); } return 42 ; }) | std::execution::upon_error ([](std::exception_ptr eptr) { try { std::rethrow_exception (eptr); } catch (const std::exception& e) { std::cout << "处理错误: " << e.what () << std::endl; return -1 ; } }); auto result = std::execution::sync_wait (risky_task); if (result) { std::cout << "最终结果: " << result.value () << std::endl; } }
并行算法集成
1 2 3 4 5 6 7 8 9 10 11 12 13 14 15 16 17 18 19 20 21 22 23 24 25 26 27 28 29 void parallel_algorithms_example () std::execution::thread_pool pool (4 ) ; auto policy = std::execution::par.on (pool.get_scheduler ()); std::vector<int > data (1000000 ) ; std::iota (data.begin (), data.end (), 1 ); std::cout << "=== 并行算法示例 ===\n" ; auto start = std::chrono::high_resolution_clock::now (); std::transform (policy, data.begin (), data.end (), data.begin (), [](int x) { return x * x; }); auto end = std::chrono::high_resolution_clock::now (); std::cout << "并行平方计算耗时: " << std::chrono::duration_cast <std::chrono::milliseconds>(end - start).count () << "ms" << std::endl; start = std::chrono::high_resolution_clock::now (); auto sum = std::reduce (policy, data.begin (), data.end (), 0LL ); end = std::chrono::high_resolution_clock::now (); std::cout << "并行求和耗时: " << std::chrono::duration_cast <std::chrono::milliseconds>(end - start).count () << "ms, 结果: " << sum << std::endl; }
高级特性
1. 任务取消
1 2 3 4 5 6 7 8 9 10 11 12 13 14 15 16 17 18 19 20 21 22 23 24 25 26 27 28 29 30 void cancellation_example () std::execution::thread_pool pool (2 ) ; auto scheduler = pool.get_scheduler (); std::execution::cancellation_source cancel_source; auto cancel_token = cancel_source.get_token (); auto long_task = std::execution::schedule (scheduler) | std::execution::then ([cancel_token]() { for (int i = 0 ; i < 100 ; ++i) { if (cancel_token.is_cancelled ()) { std::cout << "任务被取消\n" ; return -1 ; } std::this_thread::sleep_for (std::chrono::milliseconds (50 )); } return 42 ; }); auto future_result = std::execution::ensure_started (long_task); std::this_thread::sleep_for (std::chrono::seconds (1 )); cancel_source.request_cancellation (); auto result = std::execution::sync_wait (std::move (future_result)); std::cout << "任务结果: " << (result ? result.value () : -999 ) << std::endl; }
2. 条件执行和分支
1 2 3 4 5 6 7 8 9 10 11 12 13 14 15 16 17 18 19 20 21 22 23 24 25 26 27 28 29 void conditional_execution_example () std::execution::thread_pool pool (4 ) ; auto scheduler = pool.get_scheduler (); bool condition = true ; auto conditional_task = std::execution::schedule (scheduler) | std::execution::then ([condition]() { return condition ? 10 : 20 ; }) | std::execution::let_value ([scheduler](int value) { if (value == 10 ) { return std::execution::schedule (scheduler) | std::execution::then ([value]() { return value * 3 ; }); } else { return std::execution::schedule (scheduler) | std::execution::then ([value]() { return value + 100 ; }); } }); auto result = std::execution::sync_wait (conditional_task); std::cout << "条件执行结果: " << result.value () << std::endl; }
3. 批量任务处理
1 2 3 4 5 6 7 8 9 10 11 12 13 14 15 16 17 18 19 20 21 22 23 24 25 26 void bulk_execution_example () std::execution::thread_pool pool (std::thread::hardware_concurrency()) ; auto scheduler = pool.get_scheduler (); std::vector<int > input_data (1000 ) ; std::iota (input_data.begin (), input_data.end (), 1 ); std::vector<int > results (input_data.size()) ; auto bulk_task = std::execution::schedule (scheduler) | std::execution::bulk (input_data.size (), [&input_data, &results](std::size_t i) { results[i] = input_data[i] * input_data[i]; }); std::execution::sync_wait (bulk_task); std::cout << "批量处理完成,前10个结果: " ; for (int i = 0 ; i < 10 ; ++i) { std::cout << results[i] << " " ; } std::cout << std::endl; }
与传统方法的对比
代码可读性对比
1 2 3 4 5 6 7 8 9 10 11 12 13 14 15 16 17 18 19 20 21 22 23 24 25 26 27 28 29 30 31 32 33 void traditional_async_chain () auto pool = std::make_shared <SimpleThreadPool>(4 ); pool->submit ([pool]() { return 10 ; }).then ([pool](int x) { return pool->submit ([x]() { return x * 2 ; }); }).then ([pool](int x) { return pool->submit ([x]() { return x + 5 ; }); }).then ([](int result) { std::cout << "传统方式结果: " << result << std::endl; }); } void modern_execution_chain () std::execution::thread_pool pool (4 ) ; auto scheduler = pool.get_scheduler (); auto result = std::execution::sync_wait ( std::execution::schedule (scheduler) | std::execution::then ([]() { return 10 ; }) | std::execution::then ([](int x) { return x * 2 ; }) | std::execution::then ([](int x) { return x + 5 ; }) ); std::cout << "现代方式结果: " << result.value () << std::endl; }
错误处理对比
1 2 3 4 5 6 7 8 9 10 11 12 13 14 15 16 17 18 19 20 21 22 23 24 25 26 27 28 29 30 31 32 33 34 35 36 37 38 void traditional_error_handling () SimpleThreadPool pool (2 ) ; try { auto future = pool.submit ([]() -> int { if (std::rand () % 2 ) { throw std::runtime_error ("错误" ); } return 42 ; }); auto result = future.get (); std::cout << "结果: " << result << std::endl; } catch (const std::exception& e) { std::cout << "捕获异常: " << e.what () << std::endl; } } void modern_error_handling () std::execution::thread_pool pool (2 ) ; auto scheduler = pool.get_scheduler (); auto task = std::execution::schedule (scheduler) | std::execution::then ([]() -> int { if (std::rand () % 2 ) { throw std::runtime_error ("错误" ); } return 42 ; }) | std::execution::upon_error ([](std::exception_ptr) { return -1 ; }); auto result = std::execution::sync_wait (task); std::cout << "结果: " << result.value () << std::endl; }
性能和资源管理优势
1. 自动工作窃取
1
2
3
4
5
6
7
8
9
10
11
12
13
14
15
16
17
18
19
20
21
22
23
24
25
26
void work_stealing_demonstration () std::execution::thread_pool pool (4 ) ; auto scheduler = pool.get_scheduler (); std::vector<std::future<int >> futures; for (int i = 0 ; i < 20 ; ++i) { auto task = std::execution::schedule (scheduler) | std::execution::then ([i]() { int work_amount = (i % 4 ) * 100 + 100 ; std::this_thread::sleep_for (std::chrono::milliseconds (work_amount)); return i; }); futures.push_back (std::execution::ensure_started (task)); } std::cout << "工作窃取演示:所有任务将被自动负载均衡\n" ; for (auto & f : futures) { auto result = std::execution::sync_wait (std::move (f)); std::cout << "任务 " << result.value () << " 完成\n" ; } }
2. 内存效率
1 2 3 4 5 6 7 8 9 10 11 12 13 14 15 16 17 18 19 20 21 22 23 24 25 26 27 28 29 30 31 32 namespace MemoryEfficiencyComparison { void traditional_memory_usage () SimpleThreadPool pool (4 ) ; std::vector<std::future<int >> futures; for (int i = 0 ; i < 1000 ; ++i) { futures.push_back (pool.submit ([i]() { return i * i; })); } for (auto & f : futures) { f.get (); } } void modern_memory_usage () std::execution::thread_pool pool (4 ) ; auto scheduler = pool.get_scheduler (); std::vector<int > results (1000 ) ; auto bulk_task = std::execution::schedule (scheduler) | std::execution::bulk (1000 , [&results](std::size_t i) { results[i] = static_cast <int >(i * i); }); std::execution::sync_wait (bulk_task); } }
迁移指南
从自定义线程池迁移
1 2 3 4 5 6 7 8 9 10 11 12 13 14 15 16 17 18 19 20 21 22 23 24 25 26 27 28 29 30 31 32 33 34 35 36 37 38 39 40 41 42 43 44 45 46 47 48 49 50 51 52 53 54 55 56 57 class MigrationExample {public : void old_api_usage () SimpleThreadPool pool (4 ) ; auto future1 = pool.submit ([]() { return compute_value1 (); }); auto future2 = pool.submit ([]() { return compute_value2 (); }); auto result1 = future1. get (); auto result2 = future2. get (); process_results (result1, result2); } void new_api_usage () std::execution::thread_pool pool (4 ) ; auto scheduler = pool.get_scheduler (); auto task1 = std::execution::schedule (scheduler) | std::execution::then ([]() { return compute_value1 (); }); auto task2 = std::execution::schedule (scheduler) | std::execution::then ([]() { return compute_value2 (); }); auto result1 = std::execution::sync_wait (task1).value (); auto result2 = std::execution::sync_wait (task2).value (); process_results (result1, result2); } void advanced_new_api () std::execution::thread_pool pool (4 ) ; auto scheduler = pool.get_scheduler (); auto combined_task = std::execution::when_all ( std::execution::schedule (scheduler) | std::execution::then ([]() { return compute_value1 (); }), std::execution::schedule (scheduler) | std::execution::then ([]() { return compute_value2 (); }) ) | std::execution::then ([this ](auto && results) { auto [result1, result2] = results; return process_results (result1, result2); }); auto final_result = std::execution::sync_wait (combined_task); } private : int compute_value1 () return 42 ; } int compute_value2 () return 24 ; } int process_results (int a, int b) return a + b; } };
编译器支持和兼容性
1
2
3
4
5
6
7
8
9
10
11
12
13
14
15
16
17
18
19
20
21
22
23
24
25
26
27
28
29
void check_compiler_support () #ifdef __cpp_lib_execution std::cout << "支持 C++23 execution 库\n" ; std::cout << "版本: " << __cpp_lib_execution << std::endl; #else std::cout << "不支持 C++23 execution 库\n" ; std::cout << "请使用第三方实现或等待编译器更新\n" ; #endif } template <typename F>auto submit_task (F&& f) #ifdef __cpp_lib_execution static std::execution::thread_pool pool (std::thread::hardware_concurrency()) ; auto scheduler = pool.get_scheduler (); return std::execution::sync_wait ( std::execution::schedule (scheduler) | std::execution::then (std::forward<F>(f)) ); #else static SimpleThreadPool pool (std::thread::hardware_concurrency()) return pool.submit (std::forward<F>(f)).get (); #endif }
总结:为什么选择 C++23 执行器
优势总结
标准化 :统一的异步编程模型组合性 :任务可以轻松组合和变换错误处理 :结构化的错误处理机制性能 :编译器和标准库优化可读性 :声明式编程风格可扩展性 :支持自定义调度器
选择指南
1 2 3 4 5 6 7 8 void execution_framework_guide () std::cout << "\n=== C++23 执行器选择指南 ===\n" ; std::cout << "1. 新项目:直接使用 std::execution\n" ; std::cout << "2. 现有项目:逐步迁移,先用适配器\n" ; std::cout << "3. 简单任务:std::async 仍然适用\n" ; std::cout << "4. 复杂工作流:std::execution 更优\n" ; std::cout << "5. 性能关键:std::execution + 自定义调度器\n" ; }
二、内存管理与优化
内存管理
内存管理的重要性
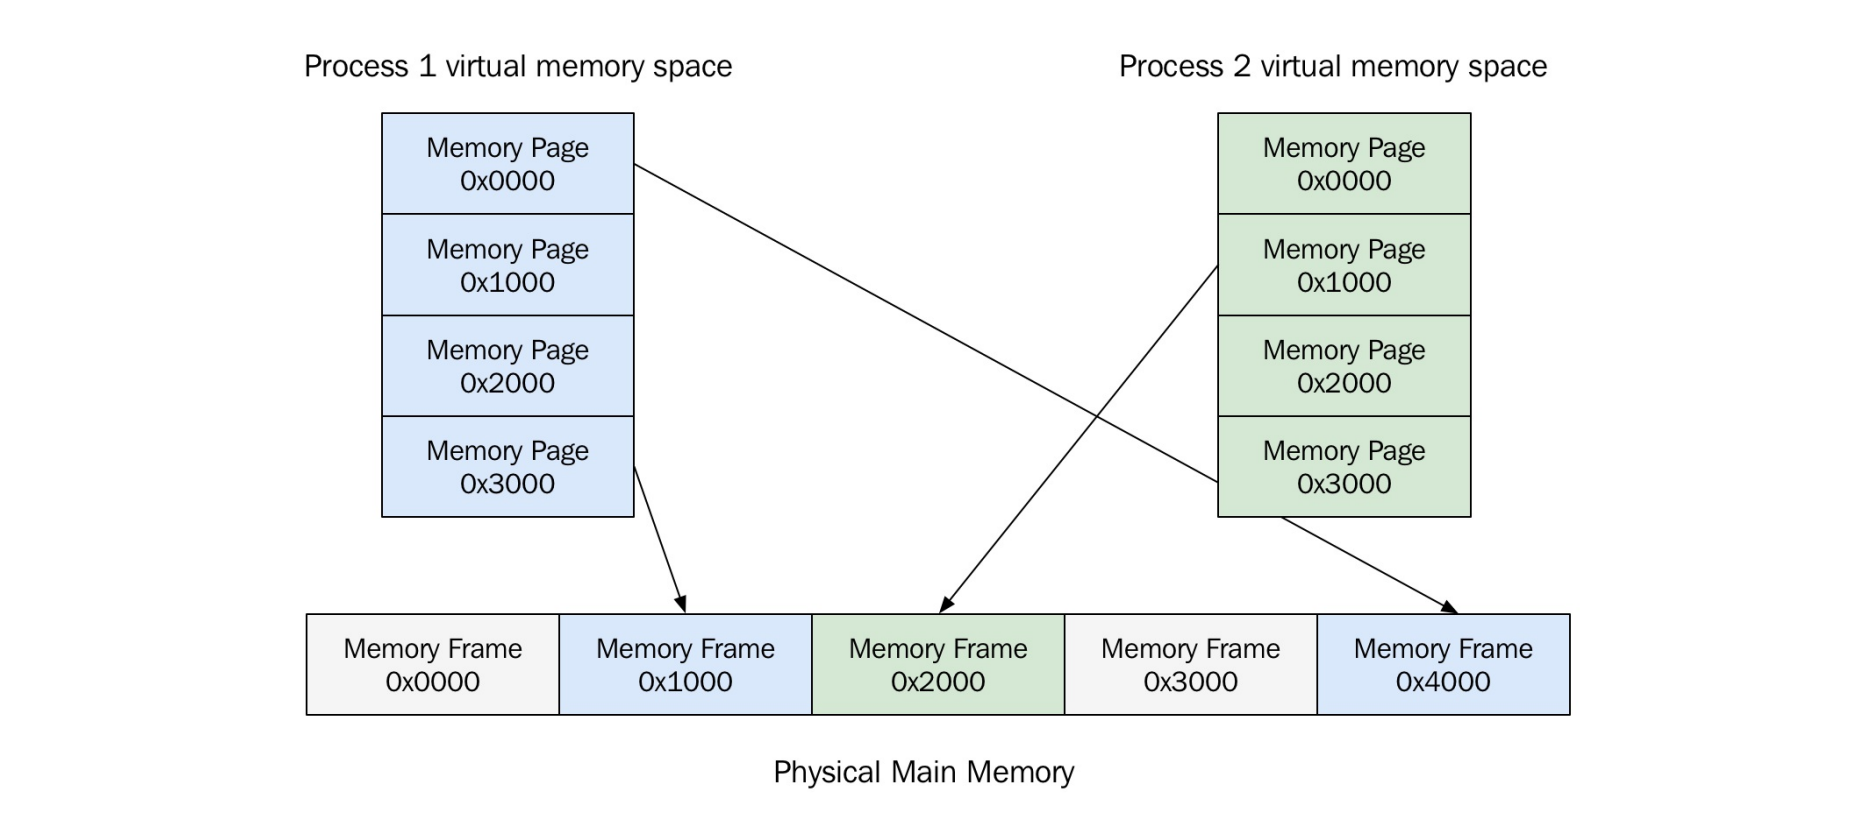
计算机内存
虚拟地址空间,内存页
image-20250717203926581
当前主流的虚拟内存实现方式是:将虚拟地址空间划分为固定大小的块,称为“内存页(page)” 。
当一个进程访问某个虚拟地址时,操作系统会检查该虚拟地址所在的页是否已加载到物理内存 中(即是否映射到了物理页框
page frame)。如果没有,就会发生 页错误(page
fault) 。
页错误并不是程序错误,而是一个正常的、受控的硬件中断,目的是从磁盘加载数据到内存 。
如果物理内存没有空闲页框了,系统就必须从内存中移除一个已有的页 (称为“页置换”)
如果被移除的页是“脏页(dirty
page) ”,即该页自从从磁盘加载进内存之后有过修改,就必须先将其写回磁盘 ,以防数据丢失。
如果是“干净页(clean
page) ”,即未被修改,直接丢弃即可,无需写回磁盘。
这整个过程被称为 paging(分页置换) 。
抖动(Thrashing)
系统物理内存不足时,频繁进行页面置换。
导致系统性能急剧下降。
通过监控page fault频率判断是否发生抖动。
进程内存
栈内存
栈是一块连续的内存区域。
每个线程有独立的栈。
栈的大小固定,超出会栈溢出。
栈内存分配和释放非常快,不会产生碎片。
栈增长方向通常向下。
示例:递归函数可能导致栈溢出。
默认栈大小约为8MB(在Mac系统上)。
每个线程都有自己独立的栈 → ✅ 线程安全
堆内存
堆是全局共享的内存区域。
用于动态内存分配(new/malloc)和释放(delete/free)。
堆内存分配模式不固定,容易产生内存碎片。
示例:频繁分配和释放不同大小内存可能导致碎片。
因为堆是共享资源 → ❌
不是线程安全 ,需要配合互斥锁等机制。
内存中的对象
而堆内存就很“混乱”:你可以随时在任意位置 new 和
delete。
这就可能造成 内存碎片(fragmentation) 。
创建与删除对象
new 与 delete 的工作原理
new 操作包含两个步骤:
分配内存(调用 operator new)。
构造对象(调用构造函数)。
delete 操作也包含两个步骤:
析构对象(调用析构函数)。
释放内存(调用 operator delete)。
1 2 3 4 5 6 7 8 9 10 11 12 13 14 15 class User { std::string name; public : User (std::string name) : name (name) {} void print_name () }; void User::print_name () std::println ("Name: {}" , this ->name); } auto user = new User{"John" };user->print_name (); delete user;
定置 new(Placement new)
new 和 delete 操作符
你只重载了内存分配函数本身 (operator new[]
和 operator new)
构造函数和数组元信息管理是编译器负责的 ,不是
operator new 负责的
编译器会自动在分配的内存中“隐藏元信息” (如元素数量),让
delete[] 知道需要调用多少次析构函数
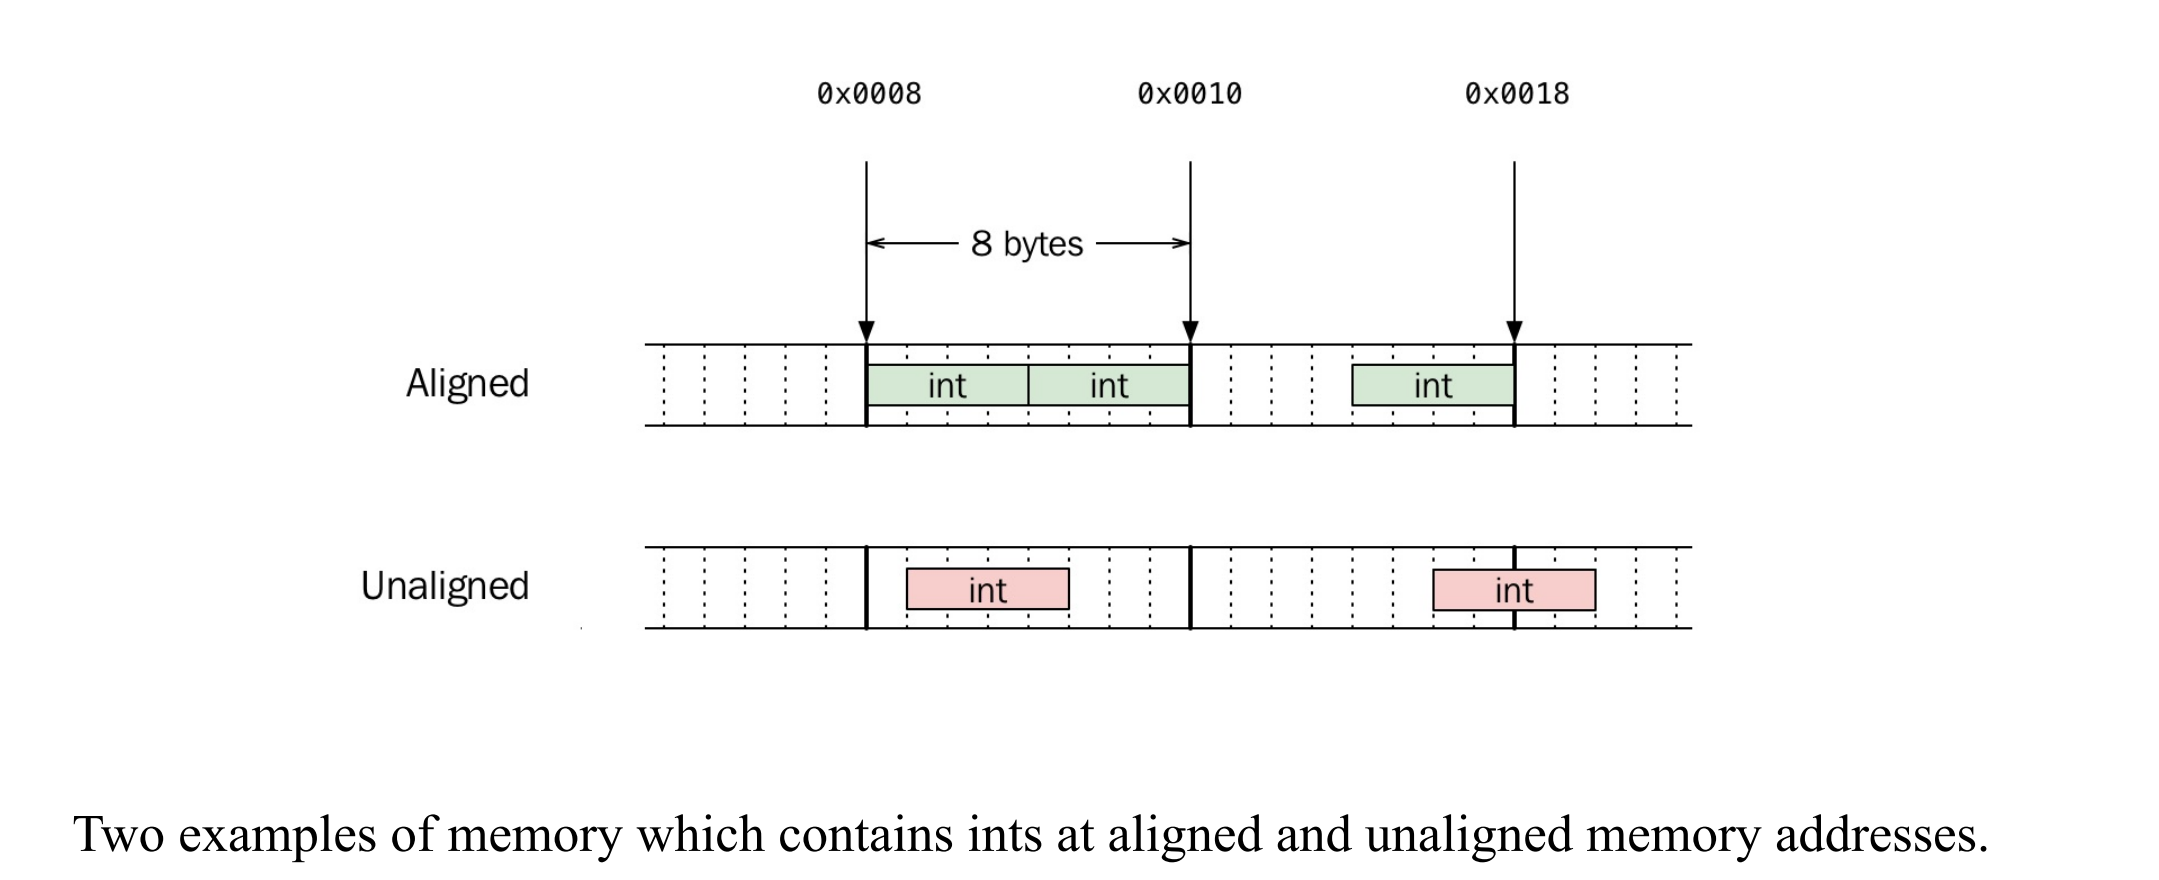
内存对齐
内存对齐是指:不同数据类型的变量必须存储在符合其“对齐要求”的地址上 ,以提高
CPU 访问效率,甚至在某些平台上是必须遵守的规则。
对齐基础
image-20250717212604845
内存分配对齐保证
填充(Padding)
编译器会在类成员之间插入填充字节以满足对齐要求。
示例:
class Document { bool; double; int; }
会因填充导致大小为24字节。
优化方法:将对齐要求大的成员放在前面。
优化后的示例:
class Document { double; int; bool; }
大小为16字节。
对齐与缓存友好性:
可以将对象对齐到缓存行边界以提高性能。
将频繁使用的成员放在一起以减少缓存行切换。
内存所有权
所有权 (ownership)表示某个变量、对象或代码块对资源(如内存、文件、数据库连接等)的控制权。
拥有某个资源就意味着负责它的释放和清理 。
处理资源隐式
使用自动变量处理动态内存的分配/释放。
通过析构函数释放动态内存,避免内存泄漏。
RAII(资源获取即初始化)技术用于管理资源生命周期。
使用RAIIConnection类自动管理连接资源,确保连接在使用后关闭。
1 2 3 4 5 6 7 8 9 10 11 12 13 14 15 16 17 18 class RAIIConnection {public : RAIIConnection (const std::string& url) : connection_{open_connection (url)} {} ~RAIIConnection () { try { close (connection_); } catch (const std::exception&) { } } auto & get () return connection_; } private : Connection connection_; };
容器
使用标准容器自动管理动态内存。
容器负责其存储对象的内存所有权。
减少代码中显式使用new和delete的情况。
智能指针
独占指针
std::unique_ptr 表示独占所有权。独占所有权不可复制,但可转移。
1 2 auto owner = std::make_unique <User>("John" );auto new_owner = std::move (owner);
共享指针
std::shared_ptr 表示共享所有权。使用引用计数跟踪对象的所有者数量。
当最后一个所有者释放时,对象自动删除。
1 auto i = std::make_shared <double >(42.0 );
弱指针
示例应用场景:
GUI 中父子窗口
父窗口持有子窗口(shared),子窗口持有父窗口(weak)
树形结构节点
父节点持有子节点(shared),子节点回指父节点(weak)
观察者模式
被观察者持有 weak_ptr 指向观察者
std::weak_ptr
表示弱所有权,不延长对象生命周期,是一种不会增加引用计数的指针。用于打破共享指针之间的循环引用。
1 2 3 4 5 6 7 8 9 10 11 12 13 14 15 16 17 18 19 20 21 22 23 24 #include <memory> #include <iostream> struct B ;struct A { std::shared_ptr<B> b; ~A () { std::cout << "A destroyed\n" ; } }; struct B { std::weak_ptr<A> a; ~B () { std::cout << "B destroyed\n" ; } }; int main () auto a = std::make_shared <A>(); auto b = std::make_shared <B>(); a->b = b; b->a = a; return 0 ; }
使用lock()方法将weak指针转换为shared指针。
1 2 3 4 5 if (auto shared_i = weak_i.lock ()) { std::cout << *shared_i << '\n' ; } else { std::cout << "对象已被销毁,无法访问\n" ; }
weak_i一个 std::weak_ptr<int>,指向某个
std::shared_ptr<int> 管理的对象(可能已释放)
weak_i.lock()尝试从 weak_ptr 获取一个临时的
shared_ptr,如果对象还存在,返回有效的
shared_ptr,否则返回空指针
if (auto shared_i = ...)如果成功获取到了有效的 shared_ptr,则进入
if 分支;否则说明原对象已经销毁,进入
else
小型优化
动态内存分配开销大 :普通的容器如
std::vector、std::string
在存储数据时,通常会在堆上分配内存。当存储的数据量很小,比如只有几个字符时,分配和释放堆内存的开销反而会影响性能。
对于短字符串或小容器,使用栈内存代替堆内存以提升性能。
标准库 std::string 通常使用小字符串优化(SSO)。
实际使用union实现短模式和长模式的内存布局切换。
示例:std::string在24字节栈内存中可存储22字符。
image-20250717221907713
自定义内存管理
构建一个内存池(Arena)
Arena是一个连续内存块,用于高效分配和回收内存。
支持固定大小分配、单线程优化、有限生命周期等策略。单线程 :无需锁,速度快
示例:使用Howard Hinnant的short_alloc实现栈分配器。
1 2 3 4 5 6 7 8 9 10 11 12 13 14 15 16 17 18 19 20 21 22 23 24 25 26 27 28 29 30 template <size_t N>class Arena { static constexpr size_t alignment = alignof (std::max_align_t ); public : Arena () noexcept : ptr_ (buffer_) {} Arena (const Arena&) = delete ; Arena& operator =(const Arena&) = delete ; auto reset () noexcept static constexpr auto size () noexcept return N; } auto used () const noexcept return static_cast <size_t >(ptr_ - buffer_); } auto allocate (size_t n) -> char * auto deallocate (char * p, size_t n) noexcept -> void private : static auto align_up (size_t n) noexcept -> size_t return (n + (alignment-1 )) & ~(alignment-1 ); } auto pointer_in_buffer (const char * p) const noexcept -> bool return buffer_ <= p && p <= buffer_ + N; } alignas (alignment) char buffer_[N]; char * ptr_{}; };
Arena类模板支持对齐内存分配。
allocate和deallocate方法用于分配和回收内存。
1 2 3 4 5 6 7 8 9 10 11 12 13 14 15 16 17 18 19 20 21 22 23 24 template <size_t N>auto Arena<N>::allocate (size_t n) -> char * { const auto aligned_n = align_up (n); const auto available_bytes = static_cast <decltype (aligned_n)>(buffer_ + N - ptr_); if (available_bytes >= aligned_n) { char * r = ptr_; ptr_ += aligned_n; return r; } return static_cast <char *>(::operator new (n)); } template <size_t N>auto Arena<N>::deallocate (char * p, size_t n) noexcept -> void { if (pointer_in_buffer (p)) { n = align_up (n); if (p + n == ptr_) { ptr_ = p; } } else { ::operator delete (p); } }
示例:为User类重载new和delete操作符,使用Arena分配内存。
1 2 3 4 5 6 7 8 9 10 11 12 13 14 15 16 17 18 19 20 21 22 auto user_arena = Arena<1024 >{}; class User {public : auto operator new (size_t size) -> void * return user_arena.allocate (size); } auto operator delete (void * p) -> void user_arena.deallocate (static_cast <char *>(p), sizeof (User)); } auto operator new [](size_t size) -> void * { return user_arena.allocate (size); } auto operator delete [](void * p, size_t size) -> void { user_arena.deallocate (static_cast <char *>(p), size); } private : int id_{}; };
自定义内存分配器
为什么类特定的 operator new 没有被调用?
因为 std::make_shared
需要一次性分配足够空间给对象和引用计数控制块 。它使用的是一次内存分配
+ placement new 构造对象 ,而不是单纯调用
new User()。
std::vector<User> users; users.reserve(10);
reserve 只分配内存,不构造元素。这内存分配调用的是 vector
默认的分配器(std::allocator),不会调用 User 的 operator
new。
自定义分配器可用于标准容器和智能指针。
C++11中自定义分配器的最小接口包括allocate和deallocate方法。
示例:实现Mallocator使用malloc/free进行内存管理。
实现ShortAlloc分配器,绑定Arena实例进行栈内存分配。
示例:使用栈内存。
1 2 3 4 5 6 7 8 9 10 11 12 13 14 15 16 17 18 19 20 21 22 23 24 25 26 27 28 29 30 31 32 template <class T , size_t N>struct ShortAlloc { using value_type = T; using arena_type = Arena<N>; ShortAlloc (arena_type& arena) noexcept : arena_ (arena) {} template <class U > ShortAlloc (const ShortAlloc<U, N>& other) noexcept : arena_ (other.arena_) {} T* allocate (size_t n) { return reinterpret_cast <T*>(arena_.allocate (n * sizeof (T))); } void deallocate (T* p, size_t n) noexcept arena_.deallocate (reinterpret_cast <char *>(p), n * sizeof (T)); } template <class U , size_t M> bool operator ==(const ShortAlloc<U, M>& other) const noexcept { return N == M && std::addressof (arena_) == std::addressof (other.arena_); } template <class U , size_t M> bool operator !=(const ShortAlloc<U, M>& other) const noexcept { return !(*this == other); } private : arena_type& arena_; };
三、模板元编程
什么是模板元编程?
模板元编程(Template
Metaprogramming)是在编译期用模板机制编写代码 ,用于自动生成最终可编译的
C++ 代码 。
正常的代码在 运行时 执行;
元编程是在 编译时 发生,生成新的代码。
用处:
实现通用函数和类(支持多种类型)
消除重复代码(如浮点版和整型版的函数)
做到编译期检查、优化甚至计算
1 2 3 4 5 6 7 8 template <typename T>auto pow_n (const T& v, int n) auto product = T{1 }; for (int i = 0 ; i < n; ++i) { product *= v; } return product; }
编译器行为: 每当你使用不同的类型
T(比如 float,
int),编译器会为你自动生成一个版本:
1 2 auto x = pow_n <float >(2.0f , 3 ); auto y = pow_n <int >(3 , 3 );
编译器会为每种模板实例化 生成真正的函数/类
模板也可以做限制和校验
1 2 3 4 5 template <int N, typename T>auto const_pow_n (const T& v) static_assert (N >= 0 , "Exponent must be non-negative" ); ... }
Type Traits(类型萃取)
type_traits 是 C++ 标准库中提供的一组
编译期工具类模板 ,用于检查或转换类型信息 ,全部在
<type_traits> 头文件里。
两种类型萃取
返回布尔/整型值的类型萃取
这些用来判断类型的某些特性(如是否是浮点数、是否是指针等):
C++17 引入了简洁写法:xxx_v
1 2 std::is_floating_point_v<float > std::is_same_v<int , int >
使用 type traits
提升函数智能性
1 2 3 4 5 6 7 template <typename T>auto sign_func (const T& v) -> int if (std::is_unsigned_v<T>) { return 1 ; } return v < 0 ? -1 : 1 ; }
编译器在编译时就知道 T 是不是
unsigned,可以直接“裁剪”掉分支:这就是类型萃取结合模板的强大之处:根据类型做出“静态分支优化” ,无运行时开销!
或者
1 2 3 4 5 6 7 8 template <typename T>auto print (T x) -> void if constexpr (std::is_pointer_v<T>) std::println ("Pointer: {}" , *x); } else { std::println ("Value: {}" , x); } }
decltype:获取变量或表达式的类型1 2 3 4 5 6 7 8 9 auto sign_func = [](const auto & v) -> int { using ReferenceType = decltype (v); using ValueType = std::remove_reference_t <ReferenceType>; if (std::is_unsigned_v<ValueType>) { return 1 ; } return v < 0 ? -1 : 1 ; };
例子2
1 2 3 4 5 6 7 8 template <typename Range>auto to_vector (const Range& r) using IteratorType = decltype (r.begin ()); using ReferenceType = decltype (*IteratorType ()); using ValueType = std::decay_t <ReferenceType>; return std::vector <ValueType>(r.begin (), r.end ()); }
std::enable_if_t
条件启用函数(SFINAE)你想让这个函数作用域所有的floating类型比如 float,
double, long double
1 2 3 4 5 template <typename T>auto interpolate (T left, T right, T power) -> std::enable_if_t <std::is_floating_point_v<T>, T> { return left + (right - left) * power; }
检测类成员函数
concept 是一个命名的布尔表达式
检查类型T是否满足特定条件
编译时求值,返回true/false
requires表达式检查代码是否有效:
1 2 3 4 5 6 7 8 9 template <typename T>concept has_print_name = requires (T obj) { obj.print_name (); }; ... if constexpr (has_print_name<T>) x.print_name (); }
constexpr 编译期函数当所有参数是编译期常量 时,它会在编译时执行。
1 2 3 4 5 constexpr auto sum (int x, int y, int z) return x + y + z; } const auto value = std::integral_constant<int , sum (1 , 2 , 3 )>;
if constexpr
编译期条件分支1 2 3 4 5 template <typename Animal>auto speak (const Animal& a) if constexpr (std::is_same_v<Animal, Bear>) a.roar () else if constexpr (std::is_same_v<Animal, Duck>) a.quack (); }
编译期 vs 运行时 多态性对比
编译期多态(模板 + if
constexpr):
类型信息在编译时已知,无需虚表,开销小,内联优化能力强 。
使用场景:追求性能,类型已知。
运行时多态(虚函数 +
多态继承):
类型信息运行时才知道,有虚表开销 。
使用场景:类型不确定或接口抽象统一。
std::tuple ——
固定大小的异构容器1 2 3 4 auto tpl = std::make_tuple (42 , std::string{"hi" }, true );auto i = std::get <0 >(tpl); auto str = std::get <1 >(tpl); auto flag = std::get <2 >(tpl);
为什么
std::tuple 不能用 range-based for 循环? 因为 std::tuple 是 异构容器 ,不同于
std::vector 等同构容器,它的每个元素可能是不同类型。而
for (const auto& v : tuple) 中 v
的类型只能是一个确定的类型,无法适配多个类型,编译器在编译期就会报错 。另外,std::tuple
也没有 begin()/end(),因此也不能用算法如
std::for_each。
如何“遍历”一个
std::tuple? 通过 模板元编程+递归调用+索引展开(index sequence)
实现编译期“展开”。
1 2 3 4 5 6 7 8 9 10 11 12 13 14 15 template <size_t Index, typename Tuple, typename Functor>void tuple_at (const Tuple& tpl, const Functor& func) func (std::get <Index>(tpl)); } template <typename Tuple, typename Functor, size_t Index = 0 >void tuple_for_each (const Tuple& tpl, const Functor& func) { if constexpr (Index < std::tuple_size_v<Tuple>) { tuple_at <Index>(tpl, func); tuple_for_each <Tuple, Functor, Index + 1 >(tpl, func); } } auto tpl = std::make_tuple (1 , true , std::string{"Jedi" });tuple_for_each (tpl, [](const auto & v) { std::cout << v << " " ; });
如何实现类似 any_of
的操作?
1 2 3 4 5 6 7 8 9 template <typename Tuple, typename Functor, size_t Index = 0 >bool tuple_any_of (const Tuple& tpl, const Functor& f) { if constexpr (Index < std::tuple_size_v<Tuple>) { return f (std::get <Index>(tpl)) ? true : tuple_any_of <Tuple, Functor, Index + 1 >(tpl, f); } else { return false ; } }
结构化绑定(C++17)简化 tuple
解包
1 2 3 4 5 auto [name, id, license] = std::make_tuple ("James" , 7 , true );for (auto && [name, id, license] : agents) { std::cout << name << ", " << id << ", " << license << '\n' ; }
用结构体代替 tuple
返回值(更可读)
1 2 3 4 auto make_bond () struct Agent { std::string name; int id; bool license; }; return Agent{"James" , 7 , true }; }
变参模板(Variadic Templates)
使函数可以接收任意数量参数
1 2 3 4 5 6 7 template <typename ...Ts>auto expand_pack (const Ts& ...values) auto tuple = std::tie (values...); } expand_pack (42 , std::string ("hi" ));→ auto tuple = std::tie (42 , "hi" );
将变参模板转为字符串(结合
tuple_for_each)
1 2 3 4 5 6 7 8 template <typename ...Ts>auto make_string (const Ts& ...values) std::ostringstream sstr; auto tuple = std::tie (values...); tuple_for_each (tuple, [&sstr](const auto & v){ sstr << v; }); return sstr.str (); } auto s = make_string (1 , "abc" , true );
动态大小 异构类型
方法一:std::any(C++17
起)
1 2 3 4 5 6 7 8 9 10 std::vector<std::any> container{42 , "hi" , true }; std::cout << a; for (const auto & a : container) { if (a.type () == typeid (int )) { std::cout << std::any_cast <int >(a); } else if (a.type () == typeid (const char *)) { std::cout << std::any_cast <const char *>(a); } }
方法二:std::variant(C++17
起)
1 2 3 4 using VariantType = std::variant<int , std::string, bool >;VariantType v = 7 ; v = std::string{"Bjarne" }; v = false ;
它是一个“受限类型的类型联合体 ”。
和 std::tuple 不同,它一次只存一个值,但类型由一个
固定列表 指定。
编译器知道它可能的类型组合,无需手动判断类型 ,使用
std::visit 自动分发。
1 2 3 std::visit ([](const auto & v) { std::cout << v; }, v);
编译器会自动为每个可能的类型生成对应的 operator()
重载,如:
1 2 3 4 5 struct FunctorImpl { void operator () (const int & v) void operator () (const std::string& v) void operator () (const bool & v) };
实际上,std::visit 做的就是一个 type-switch:
构建动态大小、异构类型容器
1 2 3 4 5 using VariantType = std::variant<int , std::string, bool >;std::vector<VariantType> container; container.push_back (false ); container.push_back (std::string{"I am a string" }); container.push_back (13 );
遍历
1 2 3 4 5 6 7 8 9 10 11 for (const auto & val : container) { std::visit ([](const auto & v){ std::cout << v << '\n' ; }, val); } int count = std::count_if (container.begin (), container.end (), [](const auto & v){ return std::holds_alternative <bool >(v); }); bool contains = std::any_of (container.begin (), container.end (), [](const auto & v){ return std::holds_alternative <std::string>(v) && std::get <std::string>(v) == "needle" ; });
反射
什么是反射(Reflection)?
“反射”是指程序在运行时 可以“查看”或“操作”自己的结构,比如成员变量、类型信息等。
C++ 不支持原生反射 ,所以我们要“伪造”一个。
问题:如何让类暴露出它的成员变量?
方法 :实现一个 reflect() 成员函数,返回
std::tie(...) 构成的 std::tuple 引用。
1 2 3 4 5 6 7 8 9 10 11 12 class Town {public : Town (size_t houses, size_t settlers, const std::string& name) : houses_{houses}, settlers_{settlers}, name_{name} {} auto reflect () const return std::tie (houses_, settlers_, name_); } private : size_t houses_{}; size_t settlers_{}; std::string name_{}; };
std::tie 会构造一个 std::tuple 的引用。
这样我们可以操作、比较、访问成员变量,就像处理 tuple
一样。
如何使用
reflect()? 🎯 目标:自动实现如下功能:
比较(==, !=, <)
输出(重载 operator<<)
1 2 3 4 5 6 7 8 9 10 auto operator ==(const Town& t) const { return reflect () == t.reflect (); } auto & operator <<(std::ostream& os, const Town& t) { tuple_for_each (t.reflect (), [&os](const auto & val){ os << val << " " ; }); return os; }
提升:用元编程自动化支持这些功能 🛠 判断类是否 reflect() 可用:
利用 std::experimental::is_detected 判断类是否有
reflect() 方法:
1 2 3 4 5 template <typename T>using has_reflect_member = decltype (&T::reflect);template <typename T>constexpr bool is_reflectable_v = std::experimental::is_detected<has_reflect_member, T>::value;
基于此,自动启用操作符重载:
1 2 3 4 template <typename T, bool B = is_reflectable_v<T>>auto operator ==(const T& a, const T& b) -> std::enable_if_t <B, bool > { return a.reflect () == b.reflect (); }
完整
1 2 3 4 5 6 7 8 9 10 11 12 13 14 15 16 17 18 19 20 21 22 class Town {public : Town (size_t h, size_t s, std::string n) : houses_ (h), settlers_ (s), name_ (n) {} auto reflect () const return std::tie (houses_, settlers_, name_); } private : size_t houses_; size_t settlers_; std::string name_; }; template <typename T, bool B = is_reflectable_v<T>>auto operator ==(const T& a, const T& b) -> std::enable_if_t <B, bool > { return a.reflect () == b.reflect (); } template <typename T, bool B = is_reflectable_v<T>>auto operator <<(std::ostream& os, const T& t) -> std::enable_if_t <B, std::ostream&> { tuple_for_each (t.reflect (), [&os](const auto & m){ os << m << " " ; }); return os; }
这套“伪反射”机制虽然比不上Java/C#的内建反射强大,但在
C++
中非常实用。它是一种利用元编程提升代码复用性和可维护性 的典范,广泛用于:
JSON/XML 序列化
数据库 ORM 映射
UI 数据绑定
自动日志/诊断系统
泛型算法适配器
安全泛型类型转换
为什么需要 safe_cast?
在 C++ 中使用
static_cast、reinterpret_cast、dynamic_cast、const_cast
时,可能会发生以下问题:
精度丢失 :比如 double 转
float,或者 int64_t 转
int32_t;符号混淆 :比如负数转无符号类型;指针类型转换错误 :不同类型的指针强转可能导致
UB(未定义行为);指针转整数 :只有
uintptr_t/intptr_t 是合法的;float -> float 的截断溢出(如 1e39
转 float 得到 inf);
因此,我们希望有一种方法:
在 调试模式 下执行运行时检查;
在 发布模式 下快速转换;
类型不合法时 编译报错 (而不是运行时爆炸)。
1 2 3 4 5 6 7 8 9 10 11 12 13 14 15 16 17 18 19 20 21 22 23 24 25 26 27 28 29 30 31 32 33 34 35 36 37 38 39 40 template <typename T> constexpr auto make_false () return false ; }template <typename Dst, typename Src>auto safe_cast (const Src& v) -> Dst using namespace std; constexpr auto is_same_type = is_same_v<Src, Dst>; constexpr auto is_pointer_to_pointer = is_pointer_v<Src> && is_pointer_v<Dst>; constexpr auto is_float_to_float = is_floating_point_v<Src> && is_floating_point_v<Dst>; constexpr auto is_number_to_number = is_arithmetic_v<Src> && is_arithmetic_v<Dst>; constexpr auto is_intptr_to_ptr = (is_same_v<uintptr_t , Src> || is_same_v<intptr_t , Src>) && is_pointer_v<Dst>; constexpr auto is_ptr_to_intptr = is_pointer_v<Src> && (is_same_v<uintptr_t , Dst> || is_same_v<intptr_t , Dst>); if constexpr (is_same_type) return v; } else if constexpr (is_intptr_to_ptr || is_ptr_to_intptr) { return reinterpret_cast <Dst>(v); } else if constexpr (is_pointer_to_pointer) { assert (dynamic_cast <Dst>(v) != nullptr ); return static_cast <Dst>(v); } else if constexpr (is_float_to_float) { auto casted = static_cast <Dst>(v); auto casted_back = static_cast <Src>(casted); assert (!isnan (casted_back) && !isinf (casted_back)); return casted; } else if constexpr (is_number_to_number) { auto casted = static_cast <Dst>(v); auto casted_back = static_cast <Src>(casted); assert (casted == casted_back); return casted; } else { static_assert (make_false <Src>(), "safe_cast(): Unsupported cast" ); return Dst{}; } }
编译期字符串哈希
目标
避免运行时重复对字符串计算哈希,提高性能。
在 std::unordered_map 中,key 是
std::string
时,每次查找都要重新计算哈希。而如果我们能在编译期就计算好哈希值 ,可以显著优化:
1 2 3 4 5 6 7 constexpr auto hash_function (const char * str) -> size_t size_t sum = 0 ; for (auto p = str; *p != '\0' ; ++p) { sum += *p; } return sum; }
实现 PrehashedString
类
1 2 3 4 5 6 7 8 9 10 11 12 13 14 15 16 17 18 19 20 21 class PrehashedString {public : template <size_t N> constexpr PrehashedString (const char (&str)[N]) : hash_{ hash_function (str)}, size_{N - 1 }, strptr_{str} {} auto operator ==(const PrehashedString& other) const { return size_ == other.size_ && std::equal (c_str (), c_str () + size_, other.c_str ()); } auto get_hash () const return hash_; } auto c_str () const -> const char * return strptr_; } private : size_t hash_; size_t size_; const char * strptr_; };
并在 std 命名空间里自定义 std::hash:
1 2 3 4 5 6 7 8 namespace std {template <>struct hash <PrehashedString> { constexpr size_t operator () (const PrehashedString& s) const return s.get_hash (); } }; }
编译期验证示例
1 2 3 4 5 auto test () const auto & s = PrehashedString ("abc" ); return std::hash<PrehashedString>{}(s); }
惰性求值与急切求值
惰性求值是一种将操作推迟到其结果真正需要时才执行的技术。
急切求值则是在操作可以执行时立即进行,不推迟。
在某些情况下,急切求值可能造成资源浪费,例如构造了未被使用的值。
音频库函数类示例
定义了一个 AudioLibrary 类用于根据名称获取音频文件。
包含两个获取函数:
get_eager(std::string id, const Audio& otherwise):即使找不到
id,也会立即加载 otherwise 参数。get_lazy(std::string id, std::function<Audio> otherwise):只有在找不到
id 时才会调用 otherwise 函数来加载音频。
使用示例
使用 get_eager()
时,即使最终结果未被使用,load_audio("default_fox.wav")
也会被执行。
使用 get_lazy()
时,load_audio("default_fox.wav")
仅在需要时执行,提升了效率。
惰性求值的优势
代码结构与急切求值方式几乎一致,但能避免不必要的计算。
提高程序性能,尤其在处理代价高昂的操作(如磁盘读取、网络请求)时更为明显。
代理对象的应用
后续内容将介绍如何使用代理对象(proxy
objects)来实现更复杂表达式的惰性求值。
代理对象可以隐藏实际计算的细节,并在真正需要结果时才触发计算。###
代理对象
代理对象是库内部的对象,对库的用户不可见。其任务是将操作推迟到必要时执行,并在表达式可被求值和优化前收集数据。代理对象应在暗处运作,使用户在使用库时仿佛它们并不存在。
使用代理比较字符串连接
示例代码中,(a + b) 创建了临时字符串进行比较,造成性能浪费。
可通过 is_concat_equal
函数直接比较连接结果,避免临时字符串构造。
使用代理对象可在保留原语法的同时实现优化。
实现代理
创建 ConcatProxy 类,表示两个字符串的连接。
自定义 String 类并重载 operator+,返回 ConcatProxy 对象。
重载 operator==,利用 is_concat_equal 函数进行比较。
最终实现语法如 (a + b) == c,性能提升且语法不变。
性能评估
测试比较 1 亿个字符串。
使用代理对象比不使用快约 10.7 倍,避免了临时字符串和内存分配。
r 值修饰符
operator== 仅接受 r 值,防止代理对象被错误使用。
若尝试存储 ConcatProxy 对象并比较,编译失败,确保安全性。
赋值连接代理
通过重载 operator String() 实现 ConcatProxy 到 String
的隐式转换。
使用 auto 会导致变量类型为 ConcatProxy,需显式转换为 String。
推迟 sqrt 计算以比较距离
使用代理对象推迟或避免在比较二维点距离时调用计算密集型的
std::sqrt()。
简单的二维点类
Point 类包含 x、y 坐标和 distance 方法。
distance 方法调用 std::sqrt(),比较两点距离。
数学基础
比较距离时,使用平方距离即可,无需调用 std::sqrt()。
平方距离在浮点数精度上更优。
实现 DistProxy 对象
创建 DistProxy 类,封装平方距离。
重载比较运算符,避免调用 std::sqrt()。
修改 Point 类的 distance 方法返回 DistProxy。
扩展 DistProxy 使其更实用
支持与另一个 DistProxy 对象比较。
支持隐式转换为 float,延迟调用 std::sqrt()。
比较距离
使用 DistProxy 的代码与未使用时语法完全一致。
实际调用的是 DistProxy 的比较方法,避免 sqrt。
计算实际距离
需要显式转换为 float,不能使用 auto。
防止 DistProxy 对象被多次转换导致多次调用 sqrt。
防止 DistProxy 的误用
通过将 operator float() 设为仅接受 r 值,防止重复调用。
只有临时对象可隐式转换为 float。
性能评估
测试查找最近点,使用 DistProxy 后性能提升约两倍。
语法保持不变,优化对用户透明。### 创意运算符重载与代理对象
管道运算符作为扩展方法
管道运算符可以模拟其他语言中的扩展方法功能。
C++不支持直接为类添加扩展成员函数。
通过重载管道运算符,可以实现类似 numbers | contains(2)
的语法。
实现管道运算符
目标是实现类似 numbers | contains(seven)
的语法来检查容器中是否包含某个值。
contains 函数需要两个参数:容器和要查找的值。创建 ContainsProxy
结构体来保存右操作数(即要查找的值)。
重载 operator|,使其接受容器和
ContainsProxy 对象,并执行查找逻辑。
优化语法
使用模板函数 contains 自动创建
ContainsProxy 对象,简化调用方式。
用户现在可以方便地对任意类型使用 | contains(value)
语法。
应用示例
支持标准容器如 std::vector<int> 和
std::vector<std::string>。
示例:检查字符串向量是否包含 "Silo",写法为
penguins | contains("Silo")。#### 中缀操作符
中缀操作符本质上是对运算符重载的一种“技巧性使用”,通过重载小于号(operator<)和大于号(operator>)来模拟中缀语法。
目标是实现类似 Python 中 in 关键字的功能,例如
"Botswana" <in> africa。
使用模板结构体 InProxy 来保存左侧操作数的值。
定义空结构体 InTag 并创建静态常量
in,以便在语法上实现 <in> 的形式。
重载 < 运算符,使其返回包含左侧值的
InProxy 对象。
重载 > 运算符,使其完成实际的查找逻辑,即调用
std::find 判断是否存在于容器中。
最终表达式 "Botswana" <in> asia 实际展开为
InProxy 对象与容器调用 operator>
来判断是否存在。
四、并发与并行编程
推荐: 这个博客
并发编程基础
并发基础
线程
得到线程ID
1 2 3 auto main () -> int std::cout << "Thread ID: " << std::this_thread::get_id () << '\n' ; }
休眠
1 std::this_thread::sleep_for (std::chrono::seconds{1 });
image-20250719090134429
硬件支持的线程数量
1 std::cout << std::thread::hardware_concurrency () << '\n' ;
理解并发的基本概念
什么是并发?
简单理解 :并发就像一个厨师同时处理多个菜品。虽然厨师只有一双手,但可以在炒菜的同时监督汤的进度,在等待烤箱的时候准备其他食材。
并发程序 :可以同时执行多个任务的程序关键思想 :让程序在等待某些操作(如文件读取、网络请求)时,不闲着,去做其他有用的工作
为什么需要并发?
1. 提高效率(多核并行)
1 2 3 4 单线程: 任务A → 任务B → 任务C (顺序执行) 多线程: 任务A ↘ 任务B (同时执行) 任务C ↗
2. 提升响应性 -
现实例子 :当你在手机上下载大文件时,你仍然可以发微信、听音乐
-
技术原理 :UI线程专门处理用户交互,后台线程处理耗时任务
3. 更好地利用硬件资源
I/O密集型任务 :即使在单核CPU上,当程序等待磁盘读取时,可以切换到其他任务CPU密集型任务 :多核CPU可以真正同时计算多个任务
实际应用场景
Web服务器 :同时处理成千上万个用户请求游戏引擎 :渲染线程负责画面,物理线程计算碰撞,音频线程播放声音视频播放器 :解码线程处理视频数据,渲染线程显示画面,音频线程播放声音
为什么并发编程困难
主要挑战
1. 数据竞争问题 -
比喻 :两个人同时想在银行账户上操作,一个存钱一个取钱,如果不协调好,账户余额就乱了
-
技术原因 :多个线程同时访问和修改同一个变量,结果不可预测
2. 时序问题 -
比喻 :就像做菜时调料的添加顺序很重要,线程执行的顺序也会影响最终结果
-
技术原因 :线程调度是不确定的,同样的代码每次运行可能产生不同的结果
3. 调试困难
调试悖论 :添加调试信息(如打印语句)会改变程序的时序,Bug可能就消失了现实类比 :就像观察量子粒子会改变其状态,观察并发程序会改变其行为
常见陷阱
1 2 3 4 5 6 7 8 9 10 int counter = 0 ;void increment_counter () for (int i = 0 ; i < 1000000 ; ++i) { counter++; } }
为什么结果错误? 1. 线程1读取counter值(比如100) 2.
线程2也读取counter值(还是100) 3. 线程1计算100+1=101,写回 4.
线程2也计算100+1=101,写回 5.
结果:两次操作后counter只增加了1而不是2
并发与并行
区别很重要!
并发 (Concurrency) - 处理多个任务 -
比喻 :一个人在厨房里同时做多道菜 -
技术 :任务在时间上重叠,但不一定同时执行 -
单核CPU :通过快速切换任务来模拟”同时”
并行 (Parallelism) - 真正同时执行
比喻 :多个厨师同时在不同灶台上做菜技术 :任务真正同时执行多核CPU :每个核心处理不同的任务
视觉对比
1 2 3 4 5 6 7 8 并发(单核): 时间线: |----A----|----B----|----A----|----B----| 线程快速切换,看起来同时进行 并行(多核): 核心1: |--------A--------|--------A--------| 核心2: |--------B--------|--------B--------| 真正同时执行
实际意义
并发 :即使单核也能提升程序响应性和资源利用率并行 :充分利用多核硬件,真正提升计算性能选择策略 :I/O密集型任务优先考虑并发,CPU密集型任务优先考虑并行
时间片轮转
单核CPU通过时间片轮转实现并发。
操作系统调度线程执行,并在时间片用完后进行上下文切换。
上下文切换耗时且可能导致缓存缺失。
程序应能适应任何调度方式,必要时使用锁控制执行顺序。
共享内存
同一进程内所有线程共享虚拟内存。
线程可以访问进程内所有可寻址数据。
默认不保护线程间共享数据,需程序员自行管理。
每个线程有独立栈空间,局部变量默认不共享。
可使用线程局部存储(TLS)避免共享。
堆内存、全局变量和静态变量默认共享。
数据竞争
什么是数据竞争?
现实比喻 :想象两个人同时想在一张纸上写字,没有协调的话,字会重叠变得乱七八糟。
技术定义 :两个或多个线程同时访问同一内存位置,且至少有一个在写入数据。
数据竞争的危害
1 2 3 4 5 6 7 8 9 10 11 12 13 14 class BankAccount { int balance = 1000 ; public : void withdraw (int amount) if (balance >= amount) { balance -= amount; } } };
解决方案
1. 原子操作 (Atomic Operations)
1 2 3 4 5 6 std::atomic<int > counter{0 }; void safe_increment () counter++; } std::println ("counter: {}" , counter.load ());
2. 互斥锁 (Mutex)
1 2 3 4 5 6 7 8 9 10 std::mutex account_mutex; int balance = 1000 ;void safe_withdraw (int amount) std::lock_guard<std::mutex> lock (account_mutex) ; if (balance >= amount) { balance -= amount; } }
3. 不可变数据 1 2 3 const std::vector<int > shared_data{1 , 2 , 3 , 4 , 5 };
互斥锁 (Mutex)
互斥锁是什么?
现实比喻 :互斥锁就像厕所的门锁 -
一次只允许一个人使用 - 其他人必须等待 - 使用完后必须开锁让其他人使用
技术原理 :Mutex = Mut ual
Ex clusion(互相排斥)
互斥锁的工作流程
1 2 3 4 5 6 7 8 9 10 11 12 std::mutex bathroom_lock; std::vector<std::string> shared_data; void thread_function (int id) bathroom_lock.lock (); shared_data.push_back ("来自线程" + std::to_string (id)); std::this_thread::sleep_for (std::chrono::milliseconds (100 )); bathroom_lock.unlock (); }
更安全的RAII方式
1 2 3 4 5 6 7 8 void safer_thread_function (int id) std::lock_guard<std::mutex> lock (bathroom_lock) ; shared_data.push_back ("来自线程" + std::to_string (id)); }
性能考虑
锁竞争 (Contention) :太多线程抢同一个锁会降低性能 -
比喻 :如果厕所只有一个,100个人排队效率就很低 -
解决 :减少锁的持有时间,或者使用更细粒度的锁
1 2 3 4 5 6 7 8 9 10 11 12 13 14 void bad_example () std::lock_guard<std::mutex> lock (mutex) ; expensive_computation (); shared_data.push_back (result); } void good_example () auto result = expensive_computation (); std::lock_guard<std::mutex> lock (mutex) ; shared_data.push_back (result); }
死锁 (Deadlock)
死锁是什么?
经典比喻 :两个人在狭窄的桥上相遇 -
甲说:“你让路我就过去” - 乙说:“你让路我就过去”
技术场景 :多个线程相互等待对方释放资源,形成循环等待
死锁实例
1 2 3 4 5 6 7 8 9 10 11 12 13 14 15 16 17 18 19 20 21 std::mutex lockA, lockB; void thread1 () std::lock_guard<std::mutex> lock1 (lockA) ; std::this_thread::sleep_for (std::chrono::milliseconds (100 )); std::lock_guard<std::mutex> lock2 (lockB) ; } void thread2 () std::lock_guard<std::mutex> lock1 (lockB) ; std::this_thread::sleep_for (std::chrono::milliseconds (100 )); std::lock_guard<std::mutex> lock2 (lockA) ; }
死锁的四个必要条件
互斥 :资源只能被一个线程使用占有并等待 :线程持有资源的同时等待其他资源不可抢占 :不能强制夺取其他线程的资源循环等待 :A等B,B等C,C等A…
避免死锁的方法
1. 锁排序 - 总是按相同顺序获取锁 1 2 3 4 5 6 7 8 9 void safe_thread1 () std::lock_guard<std::mutex> lock1 (lockA) ; std::lock_guard<std::mutex> lock2 (lockB) ; } void safe_thread2 () std::lock_guard<std::mutex> lock1 (lockA) ; std::lock_guard<std::mutex> lock2 (lockB) ; }
2. 同时获取所有锁 1 2 3 4 5 6 void atomic_lock_example () std::lock (lockA, lockB); std::lock_guard<std::mutex> lock1 (lockA, std::adopt_lock) ; std::lock_guard<std::mutex> lock2 (lockB, std::adopt_lock) ; }
3. 超时机制 1 2 3 4 5 6 7 8 9 10 11 void timeout_example () std::unique_lock<std::mutex> lock1 (lockA) ; if (lockB.try_lock_for (std::chrono::milliseconds (100 ))) { lockB.unlock (); } else { std::cout << "无法获取所需资源,放弃操作\n" ; } }
同步与异步任务
同步 vs 异步
同步任务 (Synchronous) -
比喻 :打电话订外卖,你必须等服务员接听、记录订单、确认,才能挂电话
- 技术 :调用函数后,程序阻塞等待结果返回
异步任务 (Asynchronous) -
比喻 :发微信订外卖,发完就可以去做别的事,等收到回复再处理
- 技术 :调用函数后立即返回,任务在后台执行
实际代码对比
1 2 3 4 5 6 7 8 9 10 11 12 13 std::string download_file_sync (const std::string& url) { auto data = http_get (url); return data; } void sync_example () std::cout << "开始下载...\n" ; auto data = download_file_sync ("http://example.com/file.zip" ); std::cout << "下载完成,文件大小: " << data.size () << "\n" ; std::cout << "现在可以做其他事情\n" ; }
1 2 3 4 5 6 7 8 9 10 11 12 13 14 15 16 17 18 std::future<std::string> download_file_async (const std::string& url) { return std::async (std::launch::async, [url]() { return http_get (url); }); } void async_example () std::cout << "开始下载...\n" ; auto future = download_file_async ("http://example.com/file.zip" ); std::cout << "可以立即做其他事情\n" ; do_other_work (); auto data = future.get (); std::cout << "下载完成,文件大小: " << data.size () << "\n" ; }
使用场景
同步适合的场景 : - 简单的单线程程序 -
必须按顺序执行的操作 - 调试和学习阶段
异步适合的场景 : - Web服务器(同时处理多个请求) -
用户界面(保持响应性) - I/O密集型任务(文件读写、网络通信)###
C++中的并发编程
线程支持库
线程基础
什么是线程?
比喻 :如果进程是一家公司,那么线程就是公司里的员工 -
一个公司(进程)可以有多个员工(线程) - 员工们共享公司的资源(内存) -
每个员工有自己的工作台(栈空间) - 员工之间需要协调避免冲突
创建第一个线程
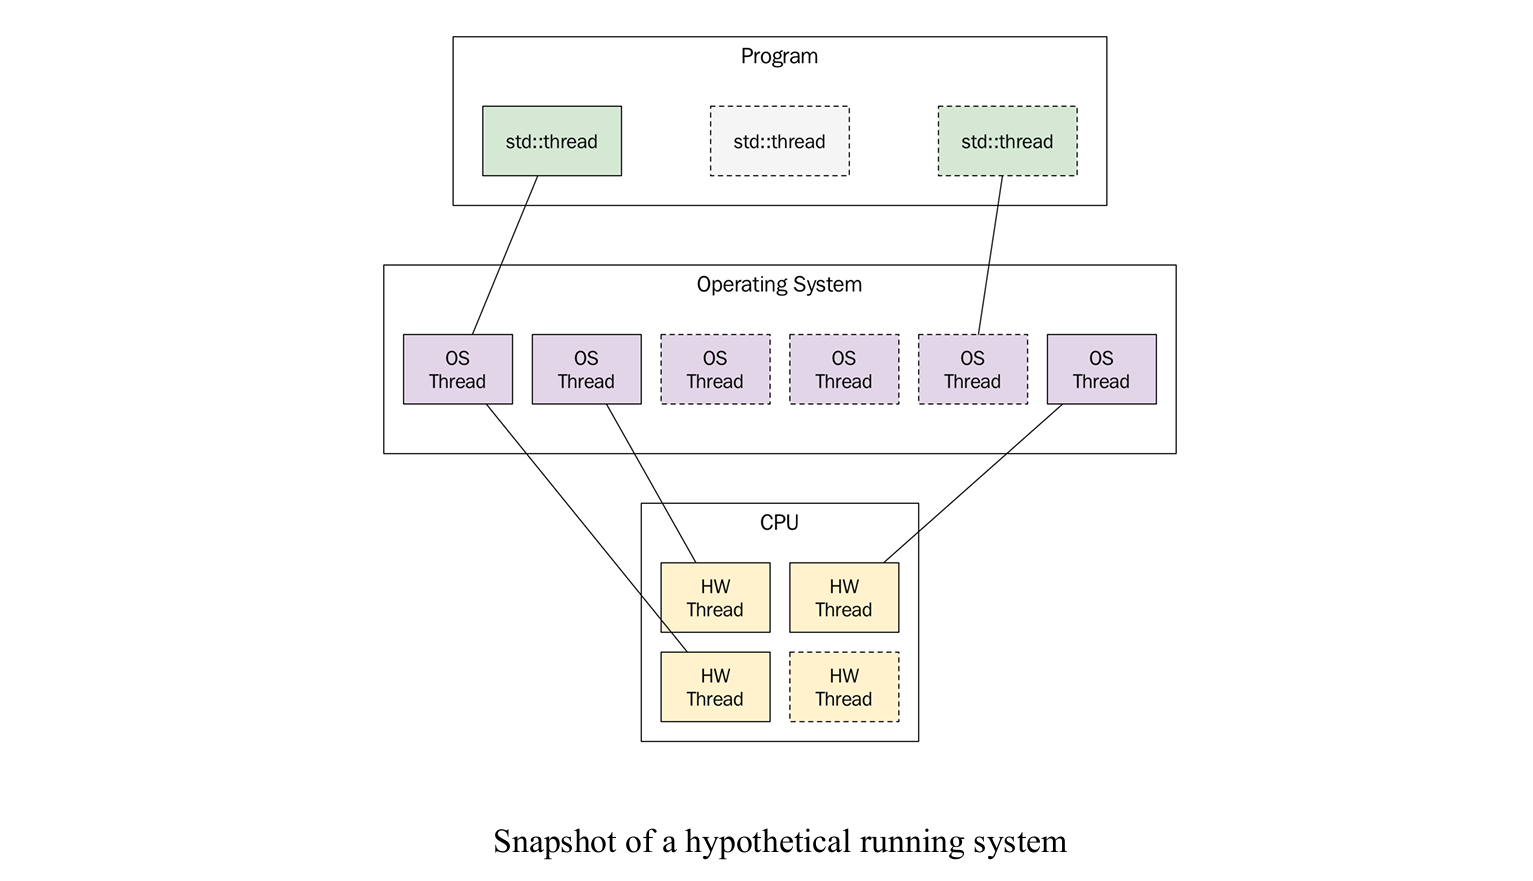
1 2 3 4 5 6 7 8 9 10 11 12 13 14 15 16 17 18 19 20 21 22 23 24 25 26 27 28 29 30 31 #include <iostream> #include <thread> #include <chrono> void worker_thread (int id) for (int i = 0 ; i < 5 ; ++i) { std::cout << "线程 " << id << " 正在工作,任务 " << i << std::endl; std::this_thread::sleep_for (std::chrono::milliseconds (500 )); } std::cout << "线程 " << id << " 完成工作" << std::endl; } int main () std::cout << "主线程开始" << std::endl; std::thread worker (worker_thread, 1 ) ; for (int i = 0 ; i < 3 ; ++i) { std::cout << "主线程正在工作,任务 " << i << std::endl; std::this_thread::sleep_for (std::chrono::milliseconds (700 )); } worker.join (); std::cout << "所有工作完成" << std::endl; return 0 ; }
join() vs detach()
1 2 3 4 5 6 7 8 9 10 11 12 13 14 15 16 17 18 19 20 21 22 23 24 25 26 27 void demonstrate_join_detach () { std::thread t1 ([]() { std::this_thread::sleep_for(std::chrono::seconds(2 )); std::cout << "t1 完成" << std::endl; }) std::cout << "等待 t1 完成..." << std::endl; t1. join (); std::cout << "t1 已完成,继续执行" << std::endl; } { std::thread t2 ([]() { std::this_thread::sleep_for(std::chrono::seconds(1 )); std::cout << "t2 完成(如果主程序还在运行的话)" << std::endl; }) t2. detach (); std::cout << "t2 已分离,主程序继续" << std::endl; std::this_thread::sleep_for (std::chrono::milliseconds (1500 )); } }
线程安全的输出
1 2 3 4 5 6 7 8 9 10 11 12 13 14 15 16 17 18 19 20 21 22 23 24 25 26 27 28 #include <mutex> std::mutex cout_mutex; void safe_print (const std::string& message, int id) std::lock_guard<std::mutex> lock (cout_mutex) ; std::cout << "线程 " << id << ": " << message << std::endl; } void thread_safe_example () std::vector<std::thread> threads; for (int i = 0 ; i < 5 ; ++i) { threads.emplace_back ([i]() { for (int j = 0 ; j < 3 ; ++j) { safe_print ("执行任务 " + std::to_string (j), i); std::this_thread::sleep_for (std::chrono::milliseconds (100 )); } }); } for (auto & t : threads) { t.join (); } }
线程状态
std::thread::hardware_concurrency()可获取硬件线程数std::thread对象可能与底层操作系统线程关联两个std::thread实例不能关联同一个线程
使用std::thread::joinable()判断线程状态
默认构造、移动后、调用detach()或join()后的线程不可连接
保护临界区
数据竞争会导致未定义行为,必须避免
使用std::mutex保护临界区
使用RAII模式(如std::lock_guard)管理锁,避免死锁
示例:使用互斥锁保护共享计数器,确保线程安全
避免死锁
同时获取多个锁可能导致死锁
使用std::lock()同时获取多个锁,避免死锁
示例:银行账户转账时使用std::unique_lock和std::lock()确保两个账户锁同时获取
条件变量
条件变量用于线程等待特定条件满足
生产者-消费者模式使用std::condition_variable和std::unique_lock
示例:生产者线程生成数据并通知消费者,消费者等待队列非空
使用while循环检查条件,避免虚假唤醒
返回数据与错误处理
使用共享变量和互斥锁容易出错,维护成本高
使用std::future和std::promise实现无共享数据的线程通信
示例:使用std::promise返回计算结果或异常
std::future::get()阻塞等待结果,支持异常传递
任务
使用std::packaged_task简化任务和未来值的绑定
示例:使用std::packaged_task封装函数调用,自动管理promise
使用std::async()实现任务异步执行,无需手动管理线程
推荐使用std::async()进行异步调用,简化并发编程
C++中的原子支持
原子变量
std::atomic提供线程安全的变量操作原子变量可锁或无锁,取决于平台和类型
可查询是否为无锁(lock-free)状态
使用std::atomic<int>代替互斥锁保护共享计数器
支持所有基本数据类型,如std::atomic_int
自定义类型必须为trivially copyable才能使用原子操作
支持原子指针,但指针指向的对象不自动线程安全
在多线程环境中使用shared_ptr
std::shared_ptr的引用计数是线程安全的控制块包含引用计数,使用原子操作保证线程安全
共享对象本身不是线程安全的,需显式加锁
全局std::shared_ptr对象需使用原子函数(如std::atomic_store和std::atomic_load)进行线程安全操作
指向对象的删除可能发生在多个线程中
C++内存模型
指令重排
编译器和硬件会优化指令顺序以提高性能
重排不影响单线程程序的执行结果
示例:交换变量访问顺序不影响结果
多线程环境下需注意重排对共享变量的影响
原子与内存顺序
内存模型定义线程间内存读写可见性
使用互斥锁或原子变量控制指令重排
互斥锁在临界区边界添加内存栅栏(acquire/release fence)
原子变量提供内存顺序控制(默认为顺序一致性)
顺序一致性保证程序执行结果与代码顺序一致
可使用更宽松的内存模型提高性能,但需谨慎使用
std::shared_ptr引用计数使用宽松内存模型,use_count()返回近似值###
无锁编程
无锁队列示例
本示例展示了一个相对简单但有用的无锁数据结构:无锁队列。
该队列适用于无法使用锁来同步共享数据的线程之间进行单向通信。
队列实现较为简单,仅支持一个读线程和一个写线程。
队列容量固定,运行时不可更改。
写线程可调用 push() 方法向队列添加元素。
读线程可调用 front() 返回队首元素,pop()
移除队首元素。
两个线程均可调用 size() 方法获取当前队列大小。
关键数据成员 size_ 使用原子类型
std::atomic<size_t> 以确保线程安全访问。
read_pos_ 仅由读线程使用,write_pos_
仅由写线程使用。std::array<T, N>
类型的缓冲区虽被两个线程访问,但算法确保不会出现并发访问同一元素的情况,因此符合C++无数据竞争访问的保证。此类无锁队列适用于如音频编程场景,例如主线程运行UI需与实时音频线程通信,而该线程不能在任何情况下被阻塞。
实时线程不能使用互斥锁、内存分配/释放等可能导致等待的操作,必须依赖无锁结构。
LockFreeQueue
的读写操作均为无锁实现,可通过两个实例实现主线程与音频线程之间的双向通信。
性能优化指南
避免锁竞争 (Avoid Contention)
问题 :多线程抢夺同一个锁会严重影响性能
实际测试 : 1 2 3 4 5 6 7 8 9 10 11 12 13 14 15 16 17 18 19 20 21 22 23 24 25 26 27 28 29 30 31 32 33 34 35 36 37 38 39 40 41 42 43 44 45 46 47 48 49 50 51 52 53 54 55 56 57 58 59 60 61 62 63 #include <chrono> #include <atomic> std::mutex high_contention_mutex; int shared_counter = 0 ;void high_contention_worker () for (int i = 0 ; i < 100000 ; ++i) { std::lock_guard<std::mutex> lock (high_contention_mutex) ; shared_counter++; } } std::mutex low_contention_mutex; int shared_result = 0 ;void low_contention_worker () int local_sum = 0 ; for (int i = 0 ; i < 100000 ; ++i) { local_sum++; } std::lock_guard<std::mutex> lock (low_contention_mutex) ; shared_result += local_sum; } void performance_comparison () const int num_threads = 8 ; auto start = std::chrono::high_resolution_clock::now (); { std::vector<std::thread> threads; for (int i = 0 ; i < num_threads; ++i) { threads.emplace_back (high_contention_worker); } for (auto & t : threads) t.join (); } auto high_contention_time = std::chrono::high_resolution_clock::now () - start; start = std::chrono::high_resolution_clock::now (); { std::vector<std::thread> threads; for (int i = 0 ; i < num_threads; ++i) { threads.emplace_back (low_contention_worker); } for (auto & t : threads) t.join (); } auto low_contention_time = std::chrono::high_resolution_clock::now () - start; std::cout << "高竞争耗时: " << std::chrono::duration_cast <std::chrono::milliseconds>(high_contention_time).count () << "ms" << std::endl; std::cout << "低竞争耗时: " << std::chrono::duration_cast <std::chrono::milliseconds>(low_contention_time).count () << "ms" << std::endl; }
优化策略
1. 批量操作 1 2 3 4 5 6 7 8 9 10 11 12 13 14 15 16 for (int i = 0 ; i < 1000 ; ++i) { std::lock_guard<std::mutex> lock (mutex) ; shared_vector.push_back (i); } std::vector<int > local_data; for (int i = 0 ; i < 1000 ; ++i) { local_data.push_back (i); } { std::lock_guard<std::mutex> lock (mutex) ; shared_vector.insert (shared_vector.end (), local_data.begin (), local_data.end ()); }
2. 读写锁 1 2 3 4 5 6 7 8 9 10 11 12 13 14 15 16 17 18 19 20 #include <shared_mutex> std::shared_mutex rw_mutex; std::vector<int > shared_data; void reader_thread () std::shared_lock<std::shared_mutex> lock (rw_mutex) ; for (auto value : shared_data) { process (value); } } void writer_thread () std::unique_lock<std::shared_mutex> lock (rw_mutex) ; shared_data.push_back (new_value); }
3. 无锁编程 1 2 3 4 5 6 7 8 std::atomic<int > atomic_counter{0 }; void lockfree_worker () for (int i = 0 ; i < 100000 ; ++i) { atomic_counter++; } }
Avoid blocking operations
现代应用的主线程不应阻塞超过几毫秒,以保持界面流畅。
应用需维持每秒60次的界面刷新率,阻塞超过16毫秒将导致帧率下降。
对耗时超过几毫秒的操作,应设计为异步函数。
iOS和Windows等平台已广泛采用异步网络API。
Number of threads/CPU cores
多核机器可支持更多并发线程,提升CPU密集型任务性能。
从单线程转为双线程可能带来接近两倍的性能提升。
增加线程数最终会达到性能瓶颈,过多线程反而导致性能下降。
I/O密集型任务(如网络爬虫)可在CPU未饱和时使用大量线程。
CPU密集型任务应使用与CPU核心数相等的线程数。
使用线程池控制线程总数,使其适应当前硬件配置。
Thread priorities
高优先级线程通常被调度更频繁,有助于降低任务延迟。
C++标准库不支持设置线程优先级,但可通过native_handle使用平台API。
优先级反转(高优先级线程等待低优先级线程释放锁)应避免。
实时线程(如音频处理)不能调用可能阻塞的函数。
Thread affinity
线程亲和性可提示调度器将线程分配到特定CPU核心以优化缓存命中。
共享内存的线程运行在同一核心可提高性能。
操作系统调度器综合考虑多种因素,不保证亲和性设置。
C++标准库不支持设置线程亲和性,但可通过平台API实现。
示例代码展示如何在Linux上设置线程亲和性掩码。
伪共享
伪共享,或称破坏性干扰,会降低性能。
当两个线程使用一些数据(这些数据在逻辑上并非线程间共享),但这些数据恰好位于同一缓存行时,就会发生伪共享。
如果两个线程在不同的核心上执行,并不断更新位于共享缓存行上的变量,它们会相互使缓存行失效,即使它们之间没有真正的数据共享。
伪共享最常出现在使用全局数据或线程间共享的动态分配数据的情况下。
一个典型的例子是在线程间共享一个数组时,每个线程只访问数组中的一个元素。
解决方法是为数组中的每个元素添加填充,以确保两个相邻元素不能位于同一缓存行。
自 C++17 起,可以使用 <new> 头中定义的
std::hardware_destructive_interference_size 常量结合
alignas 指定符来实现可移植的解决方案。
示例:通过
alignas(std::hardware_destructive_interference_size)
对结构体进行对齐,确保每个元素位于不同的缓存行。
使用 std::vector<Element>(num_threads)
创建的元素向量将保证每个元素位于独立的缓存行中。
五、实践练习
编程练习
并行
并行编程最佳实践总结
何时使用并行编程?
适合的场景
CPU密集型任务 :数学计算、图像处理、加密解密可分解的问题 :矩阵乘法、数组排序、并行搜索独立任务 :批量文件处理、多用户请求处理
不适合的场景
串行依赖强 :每一步都依赖上一步的结果任务太小 :创建线程的开销比任务本身还大简单程序 :复杂度不值得引入并发
选择正确的工具
1 2 3 4 5 6 7 8 9 10 11 12 13 14 15 16 17 18 19 20 auto future1 = std::async (std::launch::async, expensive_computation, data1);auto future2 = std::async (std::launch::async, expensive_computation, data2);auto result = future1. get () + future2. get ();std::thread worker ([&]() { process_data(shared_data); }) std::atomic<int > counter{0 }; counter++; std::mutex data_mutex; { std::lock_guard<std::mutex> lock (data_mutex) ; modify_shared_data (); }
性能优化清单
✅ 减少锁竞争 :批量操作,缩短临界区
✅ 选择合适的线程数 :通常等于CPU核心数
✅ 避免频繁创建销毁线程 :使用线程池
✅ 局部化数据 :减少false sharing
✅ 优先使用无锁结构 :atomic、lock-free
containers
创建并运行多个线程
基础示例
1 2 3 4 5 6 7 8 9 10 11 12 13 14 15 16 17 18 19 20 21 22 23 24 25 26 27 28 29 #include <thread> #include <vector> #include <iostream> void simple_worker (int id) std::cout << "Worker " << id << " is running\n" ; } int main () unsigned int max_threads = std::thread::hardware_concurrency (); std::cout << "硬件支持 " << max_threads << " 个并发线程\n" ; std::vector<std::thread> threads; for (int i = 0 ; i < max_threads; ++i) { threads.emplace_back (simple_worker, i); } for (auto & t : threads) { t.join (); } std::cout << "所有线程完成\n" ; return 0 ; }
使用基本mutex保护sum
写一个多线程,每次给sum+1,并睡觉1s
用mutex保护sum
掌握任务划分、线程池与性能评估
练习 4:并行计算数组总和
将一个大数组分成多个片段,用多个线程分别计算小段和,最后合并。
对比单线程与多线程运行时间。
练习 5:使用线程池
用 std::async /
std::future(或线程池库)实现上面的问题。
观察线程复用带来的效率提升。
练习
6:并行排序(如并行归并排序)
递归地在不同线程中进行排序合并。
控制并行层数,防止线程爆炸。
目标:掌握异步模型和现代并行库
练习 7:异步文件读取
启动多个异步任务读取不同的文件,统计每个文件的行数。
使用
async/await(Python),std::async(C++),或
CompletableFuture(Java)。
练习 8:矩阵乘法的并行实现
用线程并行计算矩阵乘法的行/列。
测试线程数对性能的影响。
练习 9:使用
OpenMP/TBB(C++)或 multiprocessing(Python)
用 OpenMP/TBB 实现 for 循环的并行处理。
实现图像灰度化或模糊滤波。
目标:综合并行策略与资源管理
练习 10:生产者-消费者模型
多线程间共享任务队列,生产者加入任务,消费者执行。
使用条件变量(std::condition_variable /
wait/notify)协调。
练习 11:并发下载器
编写多线程文件下载器,从多个 URL 下载文件。
支持任务进度统计与限速控制。
练习 12:模拟并行任务调度器
设计一个简单任务调度系统,支持任务依赖、线程池、超时控制。
实现最短优先调度或优先级队列。